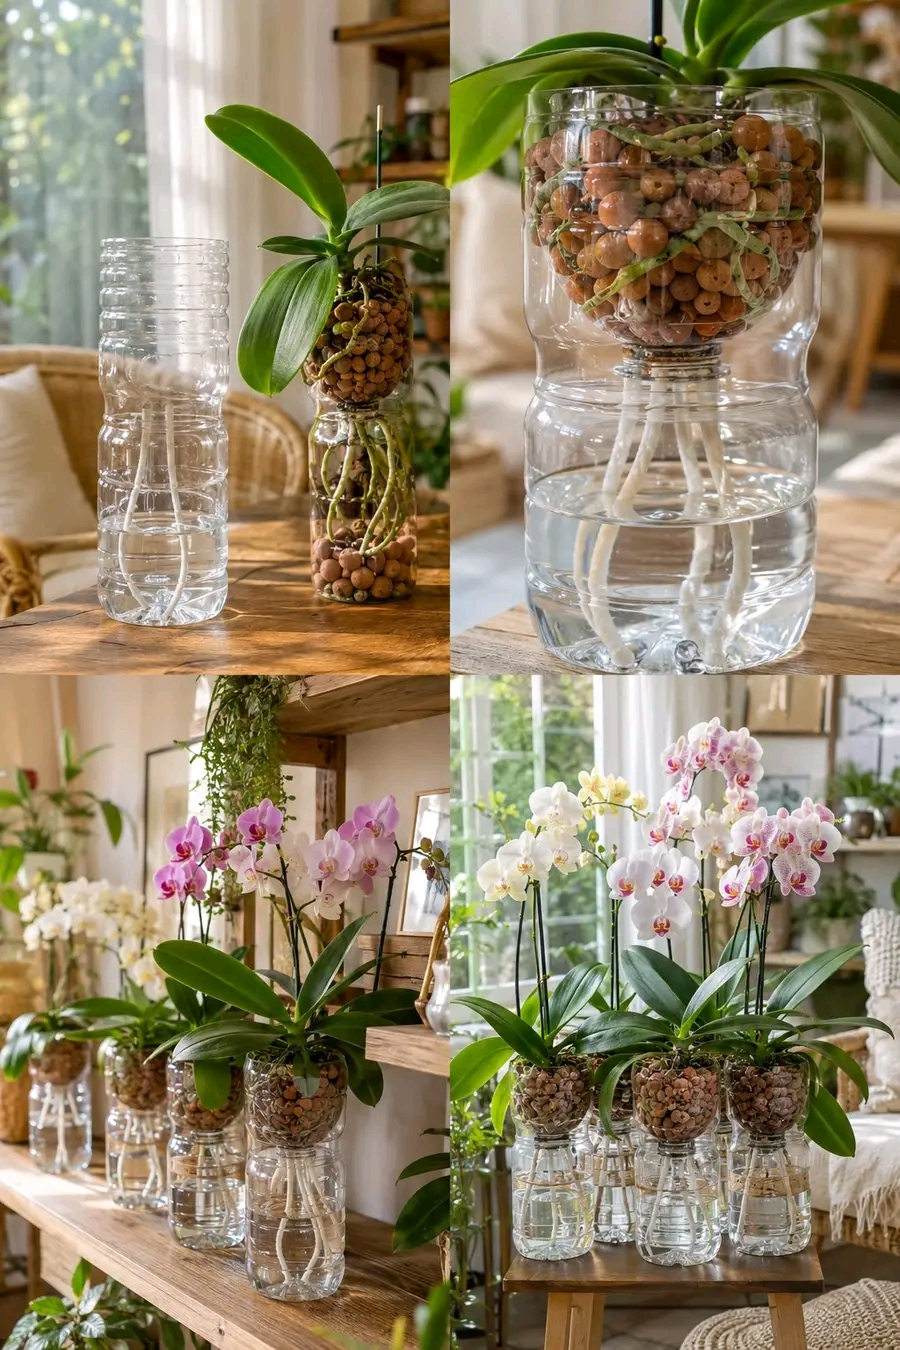
Growing thriving, vibrant orchids (Phalaenopsis) at home can sometimes feel like a delicate balancing act. Overwatering often leads to devastating root rot, while underwatering leaves roots shriveled and foliage dry. Fortunately, semi-hydroponic culture using expanded clay pebbles (LECA) combined with a simple, upcycled self-watering plastic bottle planter offers a brilliant, budget-friendly solution! 🌿✨
By transforming a discarded clear plastic water bottle into a two-tier passive wicking system, you create a continuous, self-regulating moisture environment. The bottom reservoir holds clean water, while cotton or microfiber wicks pull moisture upward into the porous LECA medium surrounding the orchid’s root system. This ensures your orchid receives optimal hydration, maximum root aeration, and constant ambient humidity without ever sitting directly in stagnant water. 🛡️✨
📊 Overview: Self-Watering Plastic Bottle Hydroponic Setup Profile ⏱️
| Feature / Requirement | Technical Specification / Detail 📏 | Horticultural Benefit & Role 💡 |
|---|---|---|
| Planter Material | Clear 1.5L – 2L Recycled Plastic Bottle 🍼 | Provides full root visibility and allows root photosynthesis |
| Growing Substrate | Expanded Clay Pebbles (LECA / Hydroton) 🪨 | Ensures 50/50 balance of moisture retention and oxygen flow |
| Wicking Mechanism | Clean Cotton Cords / Microfiber Wicks 🧵 | Draws moisture continuously from reservoir to root zone |
| Watering Frequency | Top-Up Every 2 to 3 Weeks 🗓️ | Eliminates daily watering stress and daily care monitoring |
| Humidity Level | Constant Micro-Humidity (70%+ at roots) 💧 | Prevents aerial root desiccation and encourages active growth |
| Lighting Needs | Bright, Indirect Natural Daylight ☀️ | Fuels |
🌟 Why Semi-Hydroponics in Plastic Bottles Works Magic 🛡️✨
In nature, wild orchids grow epiphytically—clinging to forest tree trunks where their roots absorb passing rainwater and rapidly dry out in warm breezes. Traditional potted soil or tightly packed bark can easily suffocate these air-loving roots when overwatered indoors. Converting to a self-watering bottle planter with clay pebbles mimics their natural canopy environment while providing significant benefits:
- Foolproof Moisture Regulation: 💧 The self-watering wick draws up liquid only as fast as the clay pebbles evaporate and the roots absorb it. This completely eliminates human error, soil compaction, and root drowning!
- Optimal Root Aeration: 🌬️ LECA pebbles create large air gaps between individual spheres, ensuring that oxygen constantly circulates around the root surface to prevent bacterial rot.
- Eco-Friendly Upcycling: ♻️ Repurposing clear plastic beverage containers reduces plastic waste while providing free, highly effective planters tailored specifically for indoor gardening.
- Continuous Visual Health Checks: 👁️ Transparent plastic lets you monitor root development, new root tip growth, and water levels instantly without disturbing the plant’s root mass.
🛠️ Materials & Tools Required for the Build ✂️
To build your own high-efficiency self-watering orchid planter as pictured, gather these simple household items and gardening supplies:
- Clear Plastic Water Bottle: 🍼 A standard 1.5-liter or 2-liter clear plastic bottle with a smooth structure.
- Expanded Clay Pebbles (LECA): 🪨 Rinsed, dust-free clay balls sized between 8 mm and 15 mm.
- Absorbent Wicking Cord: 🧵 Thick cotton rope, cotton shoelaces, or microfiber fabric strips (approx. 10–12 inches long).
- Craft Knife or Scissors: ✂️ To cut the plastic bottle cleanly around its upper third section.
- Soldering Iron or Hole Punch: 🪡 Optional tool to make small aeration holes in the upper pot funnel and bottle cap.
- Healthy Orchid Plant: 🌸 A Phalaenopsis orchid gently cleaned of old bark, moss, or dead root debris.
👩🍳 Step-by-Step DIY Self-Watering Bottle Planter Guide 🌸✨
Step 1: Cut & Prepare the Bottle ✂️
- Clean the plastic bottle thoroughly with mild soap and warm water, removing all labels and adhesive residues.
- Cut the top third of the bottle off using a sharp craft knife or scissors.
- Flip the top portion upside down to form a funnel (the upper pot), which will rest inverted inside the bottom half (the water reservoir).
Step 2: Install the Wicking System 🧵
- Drill or poke a 1/4-inch hole through the plastic bottle cap.
- Thread two long cotton or microfiber cords through the hole in the cap so that 3–4 inches dangle into the bottom reservoir and 4–5 inches extend upward into the funnel top.
- Screw the capped funnel securely back onto the neck and insert it inverted into the base bottle section.
Step 3: Prepare LECA & Position the Orchid 🪨
- Soak your LECA pebbles in fresh water for 24 hours to open their porous capillary structure, then rinse thoroughly to clear dust.
- Pour a 2-inch layer of wet LECA into the inverted top section, spreading the wicking cords evenly across the pebbles so water distributes uniformly.
- Gently center your bare-root orchid inside the funnel, spreading its green healthy roots across the pebble bed.
Step 4: Secure the Plant & Fill the Reservoir 💧
- Fill the remaining space around the orchid roots with additional LECA pebbles until the plant stands firmly upright.
- Pour clean, room-temperature filtered water into the bottom reservoir until it reaches just below the bottle cap neck. Important: The bottle cap and upper LECA layer should never sit submerged in water; only the dangling wicks should touch the reservoir liquid!
Step 5: Placement & Long-Term Maintenance ☀️
- Place your self-watering orchid on a windowsill receiving bright, indirect sunlight or beneath soft LED grow lights.
- Replenish the water reservoir every 2–3 weeks whenever the liquid level drops near the bottom.
- Once a month, flush fresh water through the top LECA to rinse away natural mineral salt build-ups, and add a diluted quarter-strength hydroponic orchid fertilizer to the fresh reservoir liquid!
💡 Pro Tips for Continuous Orchid Blooms 🌺✨
- Flush Periodically: 🚿 Clay pebbles wick up mineral salts from tap water over time. Flush the top basket under warm tap water once every month to keep roots pristine.
- Provide Ambient Air Circulation: 🌬️ Orchids thrive in gentle airflow. Placing your self-watering planters near an open window or low fan prevents stagnant humidity around flowers.
- Keep Stalks Staked: 🥢 As your orchid shoots heavy flower spikes full of colorful blooms, use slender bamboo stakes clipped to the stems to maintain upright balance! 🌸🛡️✨