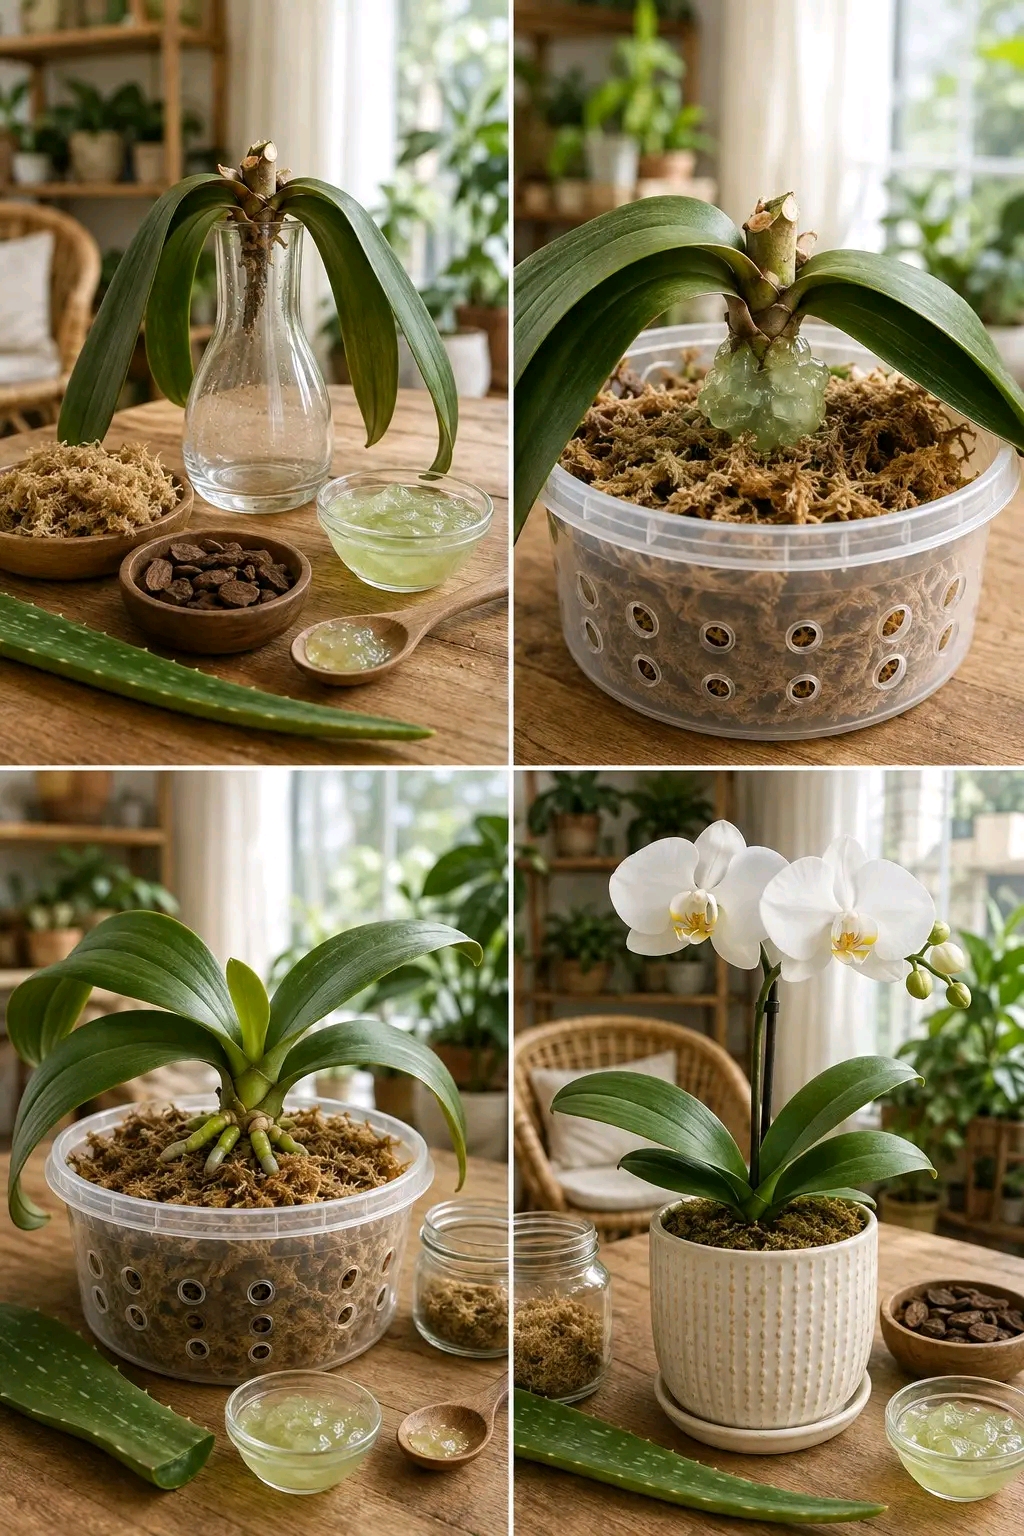
Orchids (Phalaenopsis) are among the most beloved house plants in the world, famous for their elegant, long-lasting blooms and sculptural foliage. However, indoor growers frequently face a common disaster: root rot caused by overwatering or poor drainage. When an orchid loses its root system, the leaves become droopy, limp, and dehydrated because the plant can no longer absorb moisture.
Throwing away a rootless orchid is a huge mistake. Orchids possess an astonishing capacity for regeneration if given the correct environment, adequate humidity, and proper natural growth stimulants. One of the most effective, chemical-free methods to initiate rapid root regeneration is utilizing fresh Aloe Vera gel.
Aloe Vera contains natural phytohormones (such as auxins and gibberellins), vitamins, amino acids, and potent antimicrobial compounds that shield exposed plant tissue from fungal infection while stimulating new root growth. Below is a comprehensive, blog-style guide detailing how to transform a limp, rootless stem into a thriving, blooming orchid! 🛡️✨
📊 Overview: Orchid Propagation & Root Regeneration Profile ⏱️
| Stage / Component | Key Requirement / Spec 📏 | Essential Role & Function 💡 |
|---|---|---|
| Growth Stimulant | Pure Fresh Aloe Vera Gel 🪴 | Delivers natural auxins, vitamins, and antifungal protection |
| Potting Substrate | Premium Sphagnum Moss & Bark 🪵 | Maintains airy moisture around the base without suffocating |
| Container Type | Ventilated Clear Pot (Air Holes) 🪴 | Ensures high oxygen circulation and visibility of new roots |
| Light Exposure | Bright, Indirect Sunlight ☀️ | Drives photosynthesis without burning fragile green leaves |
| Humidity Level | 60% – 80% Relative Humidity 💧 | Prevents leaf desiccation while new roots expand |
| Estimated Recovery | 3 to 6 Weeks for First Roots ⏳ | Requires |
🌿 Why Aloe Vera Works Magic for Damaged Orchids 🛡️✨
Aloe Vera is often called a natural wonder for plant propagation. When an orchid loses its primary root base, the stem base (the crown) remains vulnerable to rot and bacterial attack. Applying fresh Aloe Vera gel directly to the base creates a protective biological barrier with several unique advantages:
- Natural Rooting Hormones: 🧪 Aloe Vera contains natural auxins that send signal triggers directly to the stem tissue, urging the plant to produce root primordia (new root buds).
- Antifungal & Antibacterial Defense: 🛡️ Raw aloe gel contains salicylic acid, enzymes, and saponins that kill active spores and shield cut stem tissue against fungal pathogens.
- Hydration & Nutrient Coating: 💧 The thick, gel-like substance provides immediate localized hydration and trace minerals (vitamins A, C, E, and B-complex) directly to the stressed base.
- Zero Chemical Burn: 🌿 Unlike concentrated synthetic hormone powders, fresh aloe gel is completely organic, eliminating the risk of chemical burns on delicate orchid tissue.
🪵 Materials Needed for the Revival Process 🛠️
To duplicate the successful multi-step revival process shown in the visual guide, gather the following supplies:
- Stressed/Rootless Orchid: 🌸 An orchid crown with limp leaves and no healthy roots.
- Fresh Aloe Vera Leaf: 🌵 Cut directly from a mature aloe plant to extract pure, raw gel.
- Sphagnum Moss: 🌾 High-grade sphagnum moss acts as the primary moisture holder.
- Orchid Bark/Chips: 🪵 Coarse pine bark chips to ensure air spaces within the pot.
- Ventilated Pot: 🪴 A plastic pot equipped with multiple side aeration holes for maximum airflow.
- Glass Vessel or Base: 🏺 A temporary glass flask or small bowl for pre-soaking and prep.
- Sterilized Pruning Shears: ✂️ Rubbing alcohol wiped blades to clean dead plant material safely.
👩🍳 Step-by-Step Revival & Rooting Instructions 🌸✨
Step 1: Clean & Prepare the Base ✂️
- Inspect the base of your orchid stem carefully.
- Using sterilized shears, trim away all soft, black, mushy, or completely dried brown root remnants right up to the clean stem tissue.
- Gently wipe the leaves with a damp cloth to clean dust and allow maximum light absorption.
Step 2: Extract & Apply Fresh Aloe Vera Gel 🌵
- Cut a fresh leaf from an Aloe Vera plant and slice open a thick section to expose the gel.
- Scoop out the clear gel into a small bowl or apply a thick layer directly onto the bottom stem base of the orchid crown.
- Ensure the entire basal stem section is heavily coated in the thick gel layer. Let it sit for 15–20 minutes so the tissue absorbs the natural compounds.
Step 3: Setup the Ventilated Potting Environment 🪴
- Fill a clear, side-vented plastic pot with fluffy, pre-moistened sphagnum moss layered lightly over a few pieces of coarse orchid bark.
- Do not pack the moss tightly! Air circulation around the base is critical to prevent mold.
- Nest the aloe-coated stem base gently on top of the moss bed, keeping the main leaf crown suspended high enough so water cannot pool inside the leaf joints.
Step 4: Maintain Optimal Humidity & Light ☀️
- Place the potted setup in a warm spot (70°F–80°F or 21°C–27°C) with bright, indirect daylight. Avoid direct scorching sun!
- Keep the sphagnum moss lightly damp by misting the surface water mist regularly. Never submerge the stem base completely in standing water.
Step 5: Watch New Roots Emerge & Re-Pot 🌺
- Within 3 to 6 weeks, vibrant green root tips will emerge from the coated stem base and push downward into the moist moss.
- Once the new roots reach 2 to 3 inches in length and new central leaves begin to unfold, transfer the orchid into its permanent decorative ceramic pot filled with standard orchid bark mix!
💡 Pro Care Tips for Long-Term Orchid Success 🌸
- Never Water the Crown: 💧 Water trapped between the leaf axes leads to crown rot. Always direct water toward the media edge.
- Use Transparent Pots: 🪴 Orchid roots naturally perform photosynthesis! Clear pots allow light to reach root systems and make moisture inspection simple.
- Feed Lightly: 🧪 Wait until several strong roots develop before introducing diluted (1/4 strength) organic orchid fertilizer.
By leveraging natural ingredients like fresh Aloe Vera alongside proper ventilation and humidity control, you can save virtually any damaged orchid and bring it back to full, stunning bloom! 🛡️✨