Snake plants (Sansevieria or Dracaena trifasciata) are absolute legends in the indoor plant community! Known for their bold geometric leaves, air-purifying qualities, and incredible resilience, these low-maintenance beauties can thrive even in low light and dry conditions. But did you know that you don’t need to keep buying new pots to fill your home with them? You can easily multiply one single healthy leaf into a whole family of vibrant new plants completely for free! 🪴✨
Propagating snake plants from leaf cuttings is one of the most rewarding gardening projects you can tackle at home. Whether you choose the crystal-clear water method or plant your cuttings straight into well-draining soil, watching little roots and new green shoots emerge is pure magic. Let’s break down everything you need to master propagating snake plants step-by-step! 🌿👇
🛒 Tools & propagation Methods at a Glance
Before making your first cut, it helps to gather your tools and choose the propagation method that best fits your routine and setup 📋🌱.
| Method | Key Tools Needed | Best For | Rooting Time |
|---|---|---|---|
| Water Propagation 🫙 | • Clean sharp shears • Glass jar or vase • Filtered water | Plant parents who love watching root growth progress visually day-by-day! | 4 to 8 weeks |
| Soil Propagation 🪴 | • Clean sharp shears • Cactus/succulent soil mix • Nursery or peat pots | Growing sturdier root systems directly adapted to soil from day one! | 6 to 10 weeks |
| Perlite Propagation ⚪ | • Moist perlite • Small plastic cup/pot | Preventing leaf rot while maintaining optimal aeration and moisture! | 4 to 6 |
👩🌾 Step-by-Step Propagation Guide: Water & Soil Methods
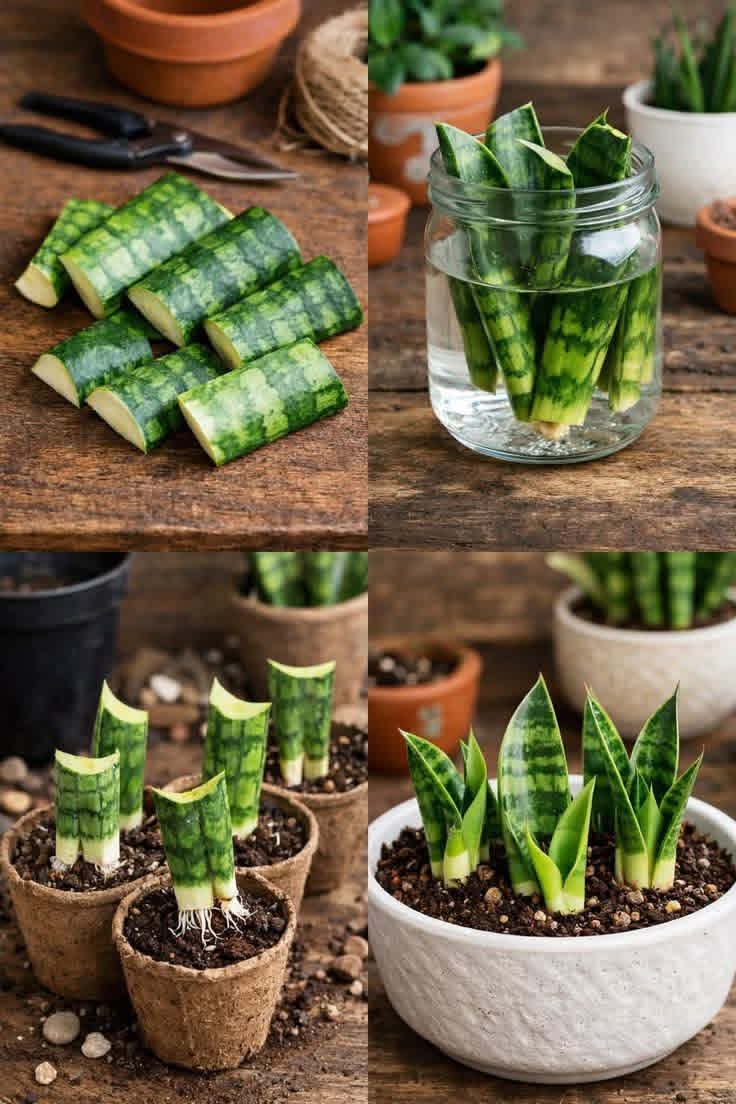
Follow this detailed breakdown (as illustrated in the step-by-step photos above) to turn one leaf into multiple potted plants! 🌿✨
Step 1: Selecting and Cutting the Leaf ✂️
- Choose a healthy, firm, undamaged snake plant leaf from your parent plant.
- Using a pair of sharp, sterilized pruning shears or a clean knife, cut the leaf off right near the base.
- Slice the long leaf horizontally into smaller 2-inch to 4-inch sections.
- Take your calloused leaf cuttings and place them upright inside a clean glass jar (as shown in the top-right panel).
- Add just enough filtered or room-temperature water to submerge the bottom 1 inch of the cuttings. Keep the rest of the leaf dry above water.
- Place the jar in a spot with bright, indirect sunlight.
- Refresh the water every 5 to 7 days to keep oxygen levels high and prevent bacteria growth 💧.
- Prepare small nursery pots or biodegradable peat pots filled with a lightweight, gritty cactus and succulent soil mix (top-left & bottom-left panels).
- Dip the calloused bottom edge of each leaf cutting into root hormone powder (optional, but speeds up growth!).
- Insert the bottom edge of the cutting about 1 inch deep into the moist soil, pressing gently around the base so it stays upright.
- Water lightly whenever the top soil feels completely dry to the touch.
- Bright Indirect Light: While snake plants tolerate low light, cuttings root much faster when placed in soft, bright, indirect sunlight ☀️.
- Avoid Overwatering: Overwatering is the number one cause of rot in snake plant cuttings! Always let the soil dry out between waterings.
- A Note on Variegated Varieties: If you propagate variegated snake plants (with yellow stripes along the edges) using leaf cuttings, the new pups will usually revert to a solid green pattern! To keep yellow stripes, propagate by root division instead 🌿.