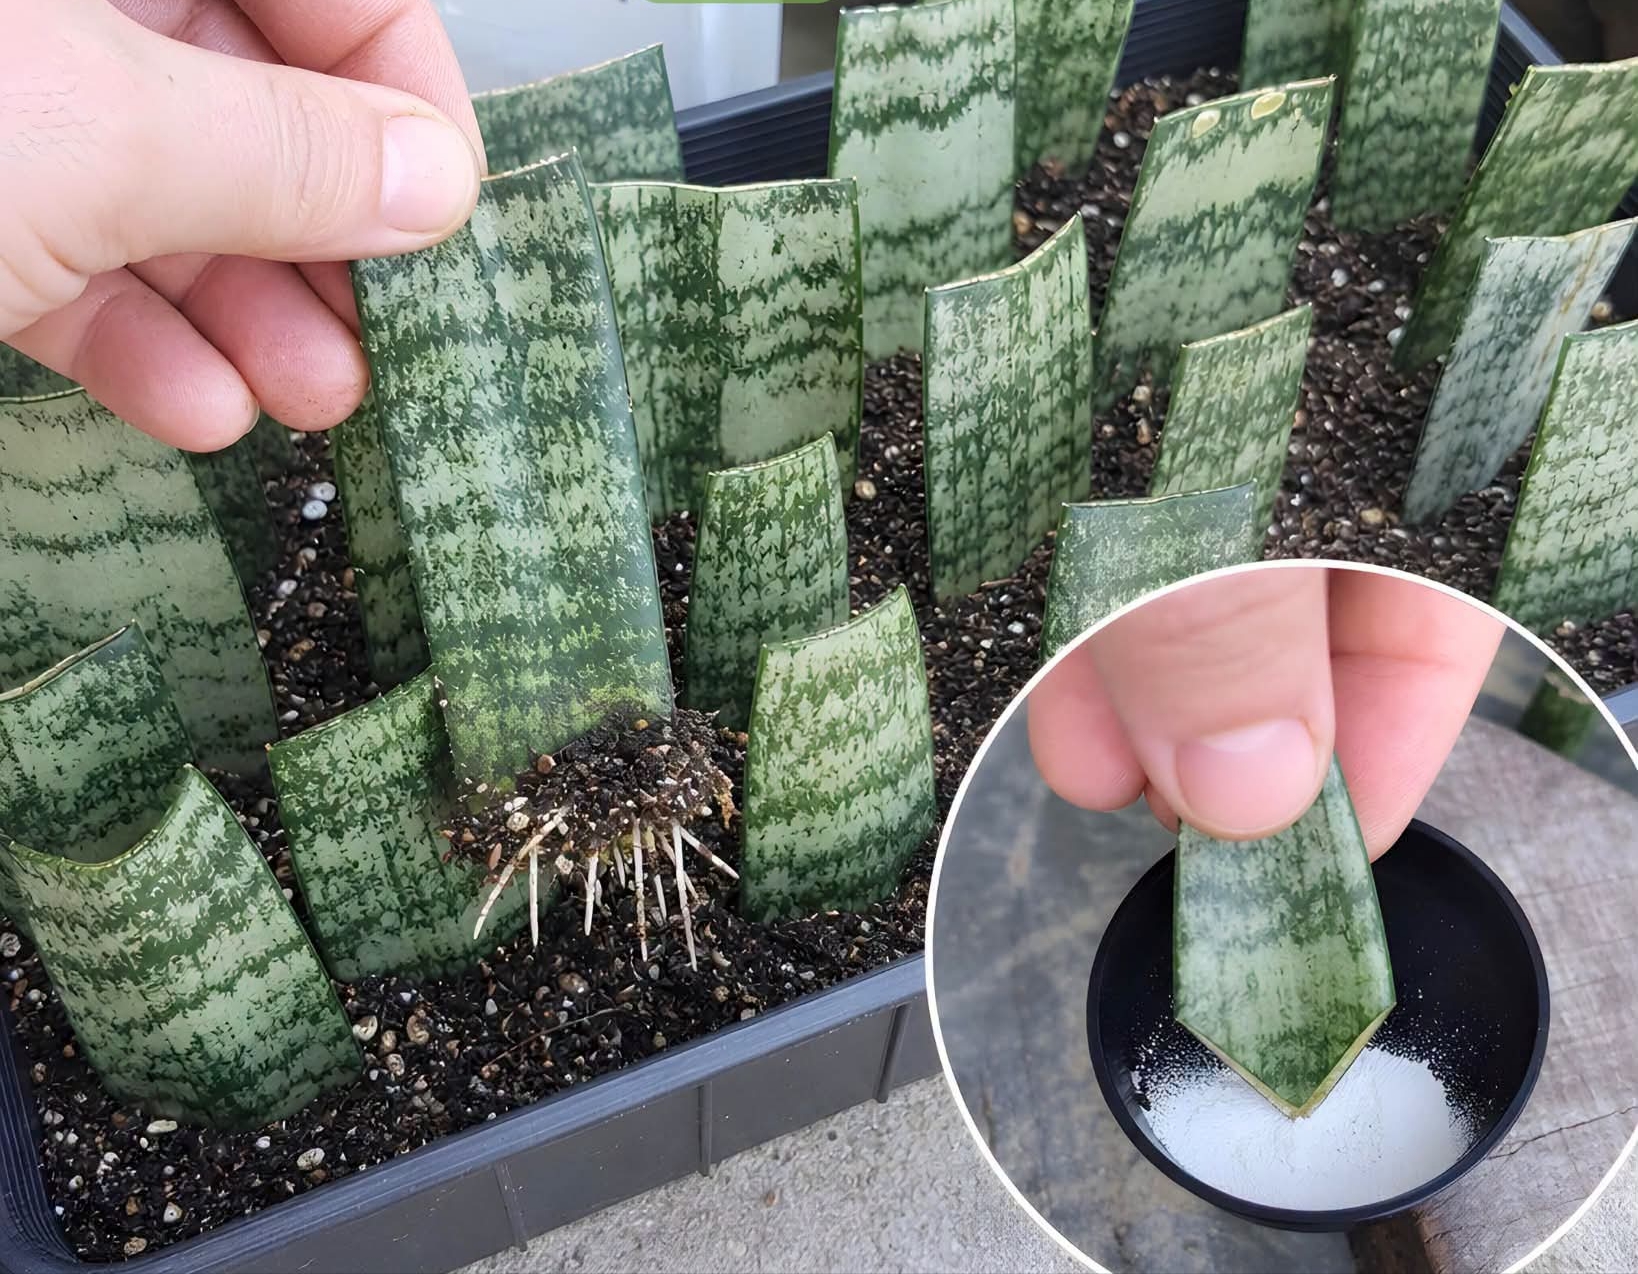
If you are a passionate indoor gardener looking to expand your urban jungle without spending a fortune, there is no more rewarding project than propagating your own houseplants. Among all popular houseplants, the Snake Plant (scientifically known as Sansevieria or Dracaena trifasciata) stands out as one of the easiest, most resilient, and most satisfying species to multiply from scratch.
As shown in the accompanying guide, propagating snake plants through leaf cuttings allows you to turn a single mature mother plant into dozens of thriving, independent new plants entirely for free. In this comprehensive, long-form guide, we will dive deep into the science, step-by-step methodology, and expert care tips required to master snake plant propagation successfully.
1. Understanding Snake Plant Anatomy and Propagation Methods
Snake plants are famously tough succulent-like perennials native to arid regions of Africa and Asia. They possess thick, upright, architectural leaves capable of storing water for long periods, which also makes them exceptional air purifiers.
While snake plants can be propagated through division (splitting the root clump), leaf cuttings are by far the most popular method when you want to multiply your collection rapidly from a single container. However, not all propagation techniques yield identical results—especially regarding variegated varieties.
The Variegation Secret: Water vs. Soil Cuttings
- Solid Green Varieties: If your mother plant has solid green leaves, propagating them via soil leaf cuttings will produce exact clones.
- Variegated Varieties (Yellow-Edged Leaves): If you take a leaf cutting from a yellow-edged snake plant (like Sansevieria trifasciata ‘Laurentii’) and plant it in soil, the resulting pups will revert to solid green and lose their yellow margins. This happens because the genetic mutation responsible for the yellow edge only exists at the base growth nodes and is lost when a detached leaf generates brand new roots from scratch. To preserve variegation, you must propagate via root division rather than leaf cuttings.
2. Step-by-Step Guide: How to Propagate Snake Plants Like a Pro
To achieve the incredible root development and pup generation shown in the reference image, follow this detailed, step-by-step workflow:
Step 1: Selecting and Harvesting the Healthy Leaf
- Choose a mature, healthy, and firm leaf from your mother plant. Avoid old, yellowing, or damaged leaves.
- Using a sharp, sterilized pair of shears or a utility knife, cut the leaf cleanly at the base close to the soil line.
- Pro Tip for Orientation: Pay close attention to which end of the leaf is the bottom (facing the soil) and which is the top. If you accidentally plant a snake plant cutting upside down, it will never root or grow.
Step 2: Cutting into Sections (The Sectioning Method)
- Slice the long leaf horizontally into sections roughly 3 to 4 inches (7 to 10 cm) long.
- Ensure every individual section maintains its correct directional orientation (bottom facing down). Some growers like to cut an inverted “V” shape at the bottom of each cutting to increase the surface area available for root initiation.
Step 3: Callus Formation (Crucial Step)
- Place your freshly cut leaf sections in a dry, shaded, well-ventilated area for 24 to 48 hours.
- Allowing the cut ends to form a hard, dry callus is essential. It prevents bacteria and fungi from entering the moist tissue and causing rot when introduced to damp soil.
Step 4: Applying Rooting Hormone (As Pictured)
- Dip the callused bottom tip of each leaf section into a container of rooting hormone powder (as highlighted in the bottom-right inset of the image).
- Rooting hormone contains auxins—synthetic or natural plant growth regulators that drastically speed up root cell division, prevent fungal rot, and guarantee a heavy, robust root system. Tap off any excess powder gently.
Step 5: Planting in Well-Draining Medium
- Fill a shallow propagation tray, flat, or pot with a light, sterile, fast-draining soil mix (such as a 50/50 blend of standard potting soil and perlite, or a specialized cactus and succulent mix).
- Insert the bottom third of each leaf cutting vertically into the soil mix, pressing the soil gently around them to hold them upright.
3. Post-Propagation Care & Maintenance
Once your cuttings are safely potted and treated, proper environmental management will dictate your success rate:
- Light Requirements: Place the propagation tray in a warm area that receives bright, indirect sunlight. Avoid harsh, direct afternoon sun, which can scorch or dry out the unrooted leaves.
- Watering Strategy: Water the soil lightly around the base of the cuttings. Keep the soil barely moist—never soggy—as excessive moisture is the primary cause of black, mushy failure. Allowing the soil to dry out slightly between light waterings encourages roots to search deeper for moisture.
- The Waiting Game: Patience is key. Snake plants grow slowly. It can take anywhere from 4 to 8 weeks for roots to form, followed by tiny underground rhizomes pushing up brand-new green shoots (pups) through the soil surface.
4. Troubleshooting Common Propagation Issues
- The Cutting Turns Mushy and Yellow: This indicates stem rot, usually caused by overwatering or failing to let the cutting callus before planting. Discard the rotting piece immediately to protect neighboring cuttings.
- No Roots After Two Months: This is usually a sign of insufficient warmth or low light. Ensure your propagation station stays in a warm indoor environment (above 70°F / 21°C).
- Leaves Wrinkling: While some minor dehydration is normal while the leaf redirects its energy into root production, severe wrinkling means the soil is too dry. Give it a gentle misting or light watering.
By following this expert routine, you can continuously multiply your snake plant collection, share free botanical gifts with fellow plant lovers, and enjoy a lush, thriving indoor garden sustainably!