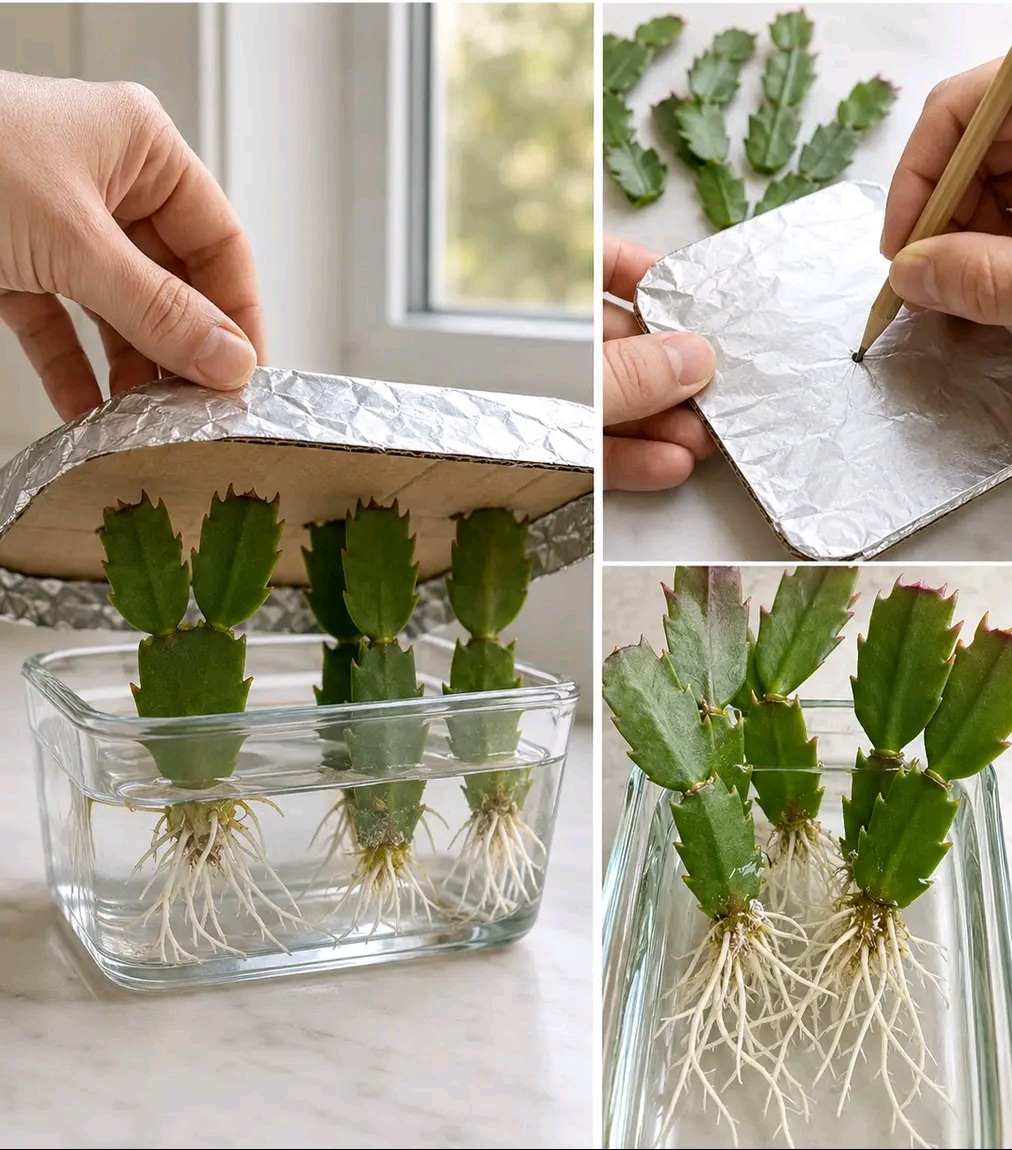
Holiday cacti—including Thanksgiving Cactus (Schlumbergera truncata) and Christmas Cactus (Schlumbergera bridgesii)—are cherished houseplants known for their striking segmented stems and vibrant winter blooms. Multiplying these beautiful epiphytic cacti from stem cuttings is one of the most rewarding gardening activities. While soil propagation is traditional, water propagation using a cardboard cover is widely recognized by plant lovers as a cleaner, faster, and more reliable method to grow strong, healthy roots. 🌵✨
By using a simple piece of cardboard wrapped in foil to suspend stem segments above a container of water, you ensure that only the lower joint or base touches liquid. This prevents segment submergence, avoids stem decay, and maintains high ambient micro-humidity around emerging roots. Below is a detailed, blog-style guide covering everything you need to master this clever propagation technique! 🛡️✨
📊 Overview: Thanksgiving & Christmas Cactus Propagation Profile ⏱️
| Feature / Step | Specification & Value 📏 | Horticultural Role & Purpose 💡 |
|---|---|---|
| Plant Type | Thanksgiving / Christmas Cactus (Schlumbergera) 🌵 | Tropical epiphytic forest cactus with jointed green stems |
| Propagation Medium | Fresh, Filtered Water + Cardboard Support 💧 | Provides moisture while preventing complete stem drowning |
| Ideal Cutting Size | 2 to 4 Flattened Stem Segments (Phylloclades) 🌿 | Ensures enough stored energy to drive rapid root growth |
| Rooting Timeframe | 2 to 4 Weeks for Healthy Root Clusters ⏳ | Highly visible process through transparent glass containers |
| Light Exposure | Bright, Indirect Natural Daylight ☀️ | Drives photosynthesis without scorching delicate new tissue |
| Callousing Time | 24 Hours in a Dry, Shaded Area ⏳ | Prevents bacterial infections when stem joins touch |
🌟 Why the Cardboard & Water Propagation Method Works Magic 🛡️✨
Unlike desert cacti, holiday cacti are tropical rainforest plants native to Brazilian coastal trees. They thrive in humid environments with high air circulation. Propagating stem cuttings in open soil can sometimes cause segments to rot or dry out before roots establish. Suspended water propagation using a custom cardboard lid solves these challenges effortlessly:
- Targeted Stem Suspension: 📌 The slotted cardboard holds stem cuttings upright, submerging only the bottom joint (node) while keeping upper segments fully dry and oxygenated.
- Rot Prevention: 🛡️ Preventing whole segments from sitting deep in water stops soft rot and fungal issues before they can start.
- 100% Root Visibility: 👁️ Clear glass containers allow you to monitor root growth, water purity, and root length daily without disturbing fragile roots.
- Higher Success Rates: 📈 Maintaining constant moisture surrounding the lower stem node encourages rapid, dense root branching compared to dry potting soils.
🛠️ Essential Materials & Tools Needed ✂️
To duplicate this high-yield propagation technique shown in the step-by-step guide, gather these simple home supplies:
- Healthy Holiday Cactus Parent Plant: 🌵 A mature Schlumbergera plant with plump, green, unwrinkled stem segments.
- Glass Container or Dish: 🥛 A clear glass rectangular dish, jar, or bowl to hold water and support the lid.
- Cardboard & Aluminum Foil: 📦 A sturdy cardboard piece cut to fit over your dish, wrapped in foil to resist moisture breakdown.
- Pencil or Skewer: ✏️ To poke neat insertion holes through the foil-wrapped cardboard lid.
- Clean Water: 💧 Filtered, distilled, or settled tap water kept at comfortable room temperature.
- Rubbing Alcohol & Scissors: ✂️ To sanitize tools if making clean cuts, though twisting segments by hand works best!
👩🍳 Step-by-Step Water Propagation Instructions 🌸✨
Step 1: Take Healthy Stem Cuttings 🌿
- Select healthy, mature stem branches containing 2 to 4 flattened segments (phylloclades).
- Gently hold the upper segment and twist the cutting where two segments join until it snaps off cleanly at the joint. Avoid tearing or squishing stem tissue!
- Place cuttings on a clean paper towel in a warm, shaded spot for 24 hours to let the broken joint callouse over.
Step 2: Build the Cardboard Lid Support 📦
- Cut a piece of cardboard slightly larger than the top opening of your glass container.
- Wrap the cardboard tightly in aluminum foil to protect it from softening due to rising water vapor.
- Use a pencil or wooden skewer to poke small holes through the lid, spacing them about 1 to 2 inches apart to give each cutting room to spread its roots.
Step 3: Assemble the Container & Insert Cuttings 💧
- Fill your glass container with clean water until it reaches 1 to 2 inches below the top rim.
- Place the prepared cardboard lid securely over the top of the glass dish.
- Gently push the bottom node of each calloused cactus cutting down through a hole in the lid so that only the lower 1/4 inch of the bottom segment touches the water surface.
Step 4: Provide Ideal Light & Monitor Growth ☀️
- Place your propagation setup on a warm windowsill receiving bright, indirect sunlight. Direct noon sun will overheat the water and scorch cuttings.
- Check water levels weekly and top off with fresh water whenever evaporation occurs.
- Within 14 to 21 days, bright white root clusters will shoot outward from the bottom joints into the water!
Step 5: Potting into Permanent Substrate 🪴
- Once roots reach 1 to 2 inches in length (as shown in the final panel), carefully lift the lid and remove the rooted cuttings.
- Plant your new cacti into a well-draining potting mix containing equal parts standard soil, perlite, and orchid bark. Water gently and enjoy your newly propagated plants! 🛡️✨
💡 Pro Care Tips for Long-Term Success 🌿✨
- Avoid Over-Pottings: 🪴 Holiday cacti bloom best when slightly root-bound. Choose small, well-draining pots for your new plants!
- Maintain High Air Humidity: 🌫️ Mist surrounding foliage occasionally during dry winter months to keep segments firm and hydrated.
- Fertilize After Establishment: 🧪 Wait 4 to 6 weeks after transplanting into soil before applying a weak, balanced organic liquid fertilizer.