If you want to fill your garden, balcony, or windowsill with brilliant, vibrant pink blossoms without spending money at plant nurseries, learning how to propagate Geraniums (Pelargonium) is your ultimate superpower 🌺✨! Famous for their lush scalloped foliage, sturdy stems, and dramatic floral heads, geraniums are among the most rewarding flowering plants to grow. While soil propagation works well, root propagation in plain water is cleaner, faster, and lets you watch the fresh white root structures develop right before your eyes 🌸🌱!
Water propagation allows garden lovers to duplicate their favorite parent plants effortlessly. By snipping healthy stem cuttings, stripping lower foliage to prevent rot, and placing them in clean water, you can generate vigorous root systems within a few short weeks 🌺✨. Let’s explore the ultimate comprehensive propagation guide, technical specifications, step-by-step instructions, and expert post-planting care tips!
🛒 Master Geranium Propagation & Growth Specs
To ensure your stem cuttings transform into blooming, bushy plants, understanding key propagation criteria and environmental requirements is crucial. Here is your master plant specs breakdown 📋✨:
| Propagation Parameter | Ideal Requirement / Value | Technical Purpose & Function | Success Signal / Indicator |
|---|---|---|---|
| Cutting Length ✂️ | 4 to 6 inches (10–15 cm) | Provides adequate stem surface area and stored energy for rooting. | Healthy green stem with at least 2–3 leaf nodes present. |
| Propagation Medium 💧 | Fresh Filtered Room-Temp Water | Hydrates the stem while allowing oxygen exchange around cut nodes. | Clear, clean water free of cloudiness, algae, or odor. |
| Rooting Timeframe ⏰ | 2 to 4 Weeks | Gives the node tissue time to form calluses and sprout fresh feeder roots. | Healthy, thick white roots growing 1 to 2 inches long. |
| Light Exposure ☀️ | Bright, Indirect Sunlight | Drives photosynthesis without scorching delicate unrooted cuttings. | Leaves remain firm, bright green, and free of yellowing. |
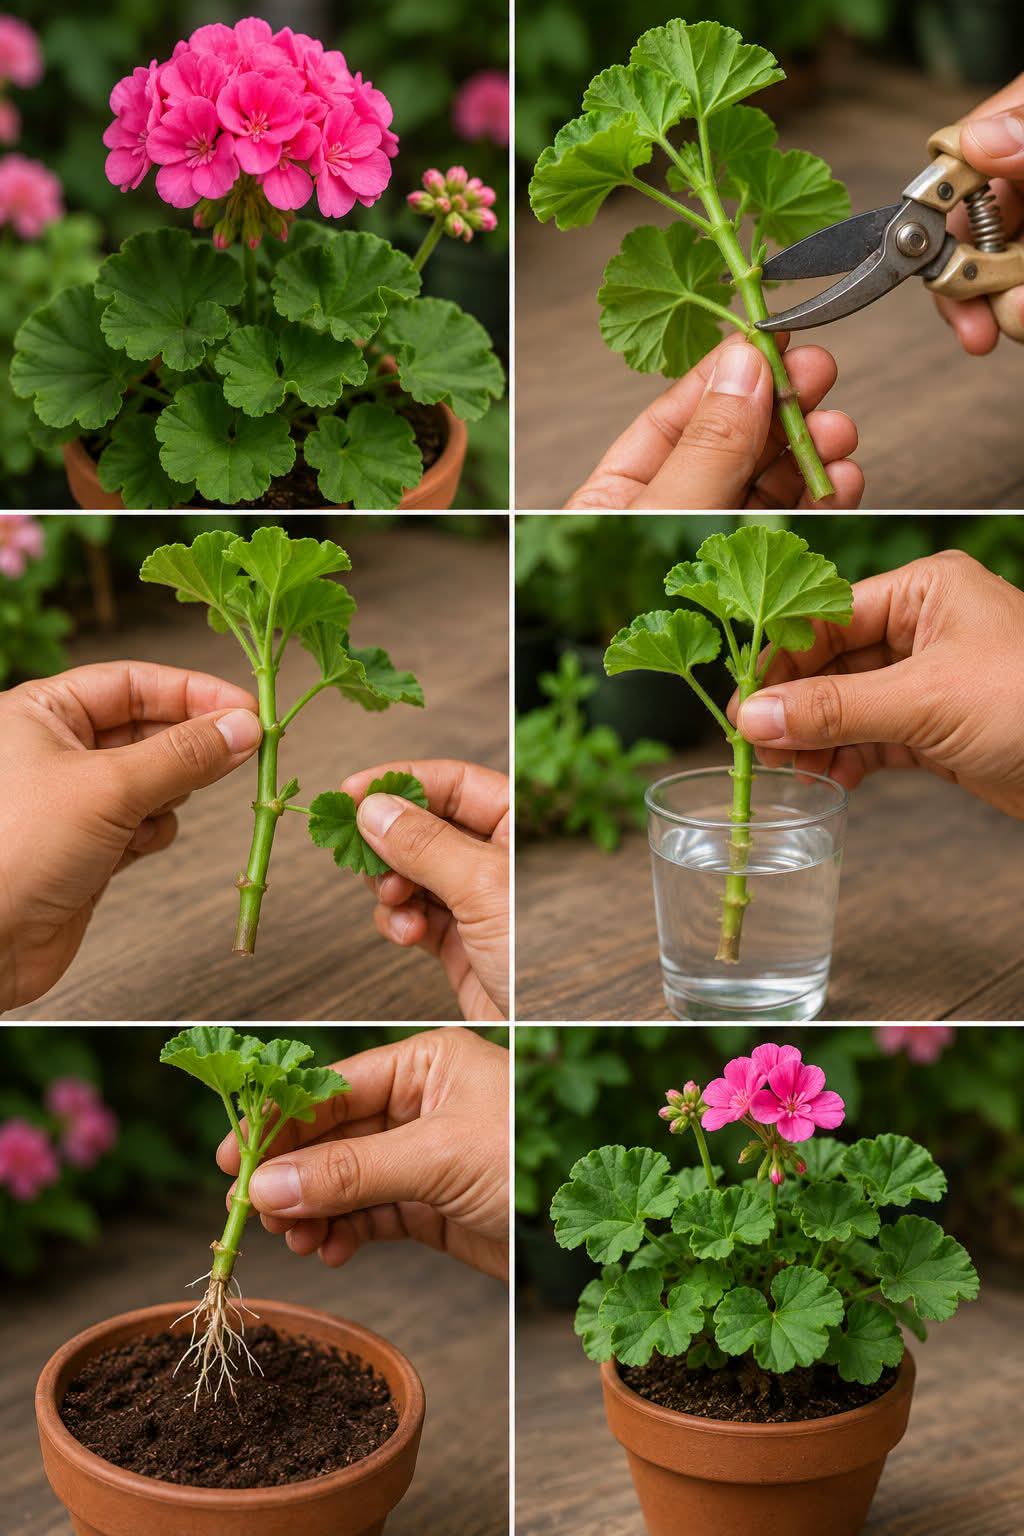
| Potting Mix Finish 🪴 | Well-Draining Soil + Perlite | Transition medium that supplies rich nutrients after roots transfer to pots. | Rapid new leaf growth and vibrant pink floral heads (bottom right!). |
👩🌾 Step-by-Step Water Propagation Guide for Geraniums
Follow this simple 5-step visual guide to multiply your bright pink geraniums cleanly and successfully 🌸✨!
Step 1: Select and Cut Healthy Stems ✂️🌺
- Choose a healthy, vibrant parent geranium plant showing strong green foliage and active growth (top-left panel).
- Using sterilized pruning shears or a sharp knife, make a clean diagonal cut directly below a leaf node on a healthy stem, measuring about 4 to 6 inches long (top-right panel).
- Avoid taking cuttings from weak, diseased, or woody old stems.
Step 2: Strip Lower Leaves to Expose Nodes 🌿
- Carefully strip off the lower leaves along the bottom half of the cutting using your fingers (middle-left panel).
- Removing lower foliage prevents leaves from submerging in water, which causes bacterial decay and stem rot.
- Keep 2 to 3 healthy top leaves attached so the cutting can continue photosynthesizing.
Step 3: Submerge Cutting in Clean Water 💧✨
- Fill a clean clear glass or small jar with filtered, room-temperature water.
- Place the prepped geranium stem into the glass, ensuring the bare bottom nodes are completely submerged while remaining leaves rest above the rim (middle-right panel).
- Place the glass in a warm location receiving bright, indirect sunlight. Change the water every 3 to 5 days to keep oxygen levels high!
Step 4: Monitor Root Development & Callus Growth ⏰🌱
- Over the next 14 to 21 days, small white root initials will emerge from the submerged nodes.
- Allow the roots to grow until they reach approximately 1.5 to 2 inches in length (bottom-left panel).
- Healthy roots will appear bright white, firm, and bushy!
Step 5: Pot Up into Soil & Enjoy Pink Blooms 🪴🌸
- Fill a small terra cotta pot with a well-draining potting mix blended with perlite or coarse sand.
- Make a small hole in the center, insert the rooted cutting gently, and press the soil lightly around the stem.
- Water thoroughly and keep in bright light. Within a few weeks, your new geranium plant will produce fresh green leaves and dazzling pink flower clusters (bottom-right panel)!
💡 Expert Culinary & Gardening Tips for Geranium Success
- Remove Flower Buds During Rooting: If your cutting has existing flower buds, pinch them off before placing the stem in water 🌺. This redirects all energy into root production rather than blooming!
- Prevent Stem Rot: Let the cut end of the stem sit out on a paper towel for 1 to 2 hours before placing it in water. This allows a protective callus to form over the cut node!
- Pinch for Bushier Growth: Once your transplanted geranium starts growing in soil, pinch off the top growing tip to encourage side branching for a fuller, bushier plant packed with more flowers!
Enjoy multiplying your beautiful pink geraniums and creating a stunning indoor or garden floral display! 🌺✨