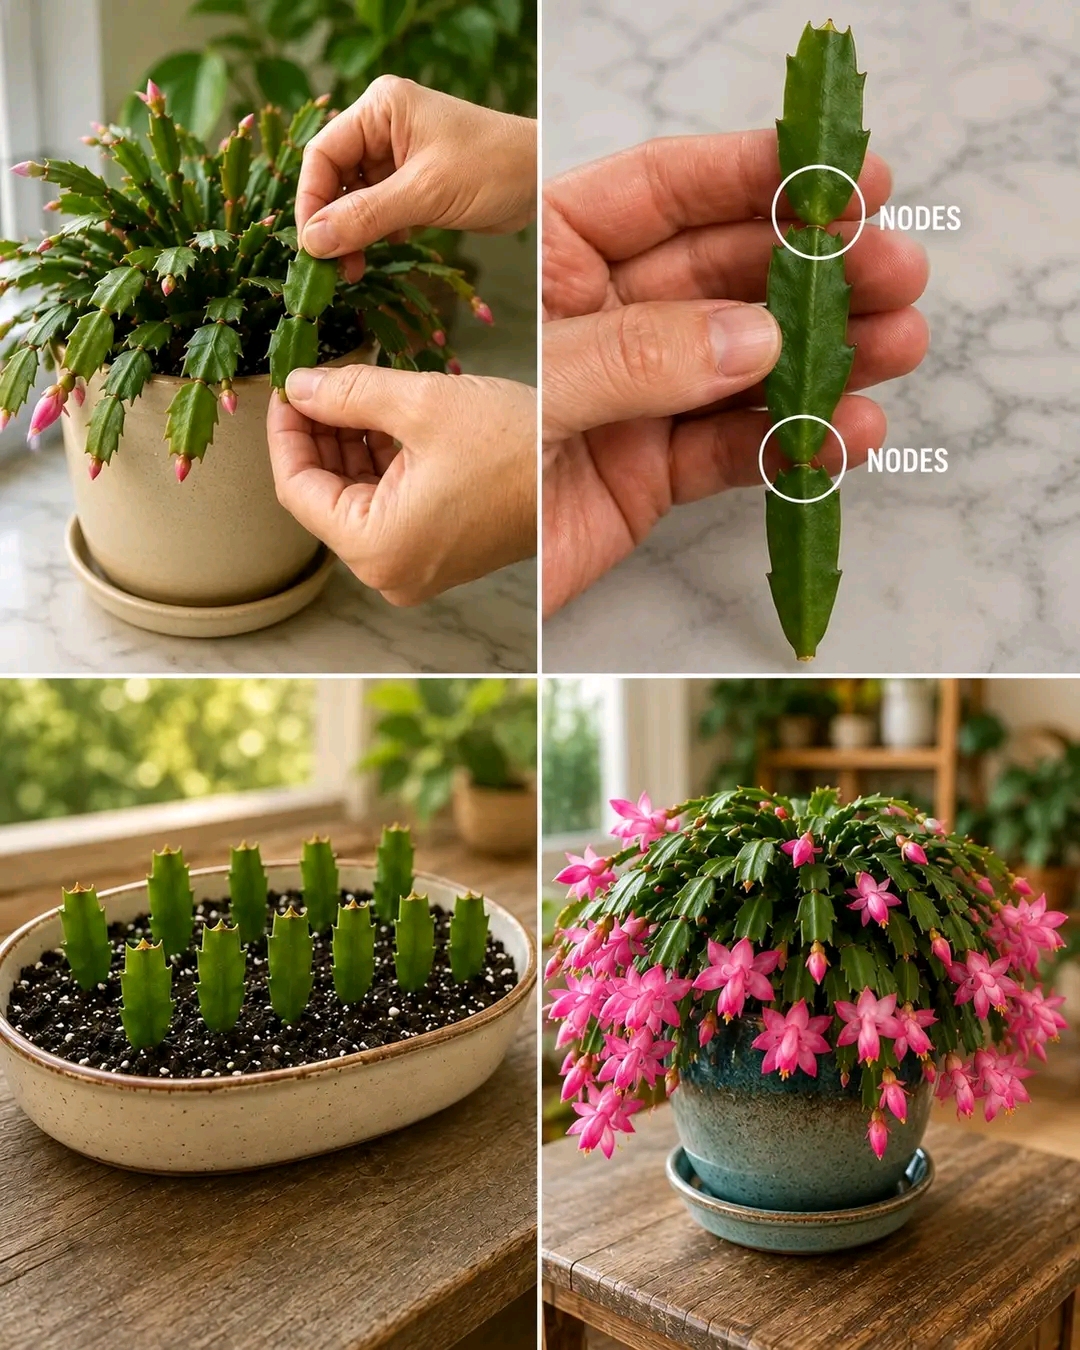
🌟 IntroductionThe Christmas Cactus (Schlumbergera bridgesii) is a beloved houseplant famous for its cascading emerald stems and vibrant, trumpet-shaped flowers that bloom during late autumn and winter.Unlike typical desert cacti, Christmas Cacti are tropical epiphytes originating from the humid coastal rainforests of Brazil. They thrive in indirect light, well-draining soil, and high atmospheric humidity.Multiplying your Christmas Cactus through stem cuttings is extremely easy, budget-friendly, and rewarding! In this masterclass guide, you will learn step-by-step how to take healthy cuttings, establish root systems in containers, provide top-tier care, and feed them with a custom Compost Tea & Coffee Liquid Fertilizer.
✂️ Phase 1: Selecting and Harvesting CuttingsSuccessful propagation begins with proper cutting selection and understanding the plant’s distinct anatomy.
📌 Step-by-Step Harvesting Technique:
🟢 Step 1: Locate Healthy NodesLook closely at the flattened leaf-like segments (called clades or phylloclades). The joint where two segments connect is called a node.
✂️ Step 2: The Clean TwistSelect strong stems with 2 to 4 healthy segments. Hold the stem firmly near the node between your index finger and thumb, then twist gently until it snaps off cleanly. Avoid using dull scissors, as crushing the stem tissue invites fungal rot.
⏳ Step 3: Callusing (The Golden Rule)Lay your harvested stem cuttings flat on a paper towel in a warm, shaded area for 24 to 48 hours. Allowing the cut end to heal and form a dry callus is essential to prevent root rot when planted.🪴 Phase 2: Planting Cuttings into the ContainerOnce callused, your cuttings are ready to be potted into a dedicated propagation container.
🧪 Ideal Propagation Soil Mix:
| Soil Component | Percentage | Purpose |
|---|---|---|
| Quality Potting Soil | 50% | Provides structural support & organic nutrients |
| Perlite or Coarse Sand | 30% | Ensures rapid water drainage & oxygen aeration |
| Peat Moss or Coco Coir | 20% | Retains moisture while improving soil texture |
📌 Insertion & Planting Steps:📇 Prepare Container: Fill a shallow tray or container equipped with bottom drainage holes with your soil mix. Dampen the soil until it feels like a wrung-out sponge.
📍 Insert Cuttings: Push the bottom node of each cutting approximately 1 to 1.5 cm (0.5 inch) deep into the moist mix.
🟩 Space Out: Plant cuttings in neat, uniform rows spaced 2 to 3 cm apart. Press the soil gently around each cutting so it stands upright.
☀️ Phase 3: Rooting Environment & Daily CareDuring the first 3 to 6 weeks, your goal is to maintain high humidity and warm temperatures to encourage rapid root growth.
📋 Environment & Care Checklist:
☕ Phase 4: Boosting Growth with “Compost Tea + Coffee” Liquid GoldAfter 4 to 6 weeks, your cuttings will have established strong root systems. Now it’s time to feed them with a powerful, homemade organic booster!
- 🥣 How to Prepare the Fertilizer:Steep: Mix the organic compost and coffee grounds into 1 gallon of water. Let it steep at room temperature for 24 to 48 hours, stirring twice daily.Filter: Strain the mixture through cheesecloth or a fine mesh sieve to remove solid debris.Dilute: Add water until the liquid looks like weak, pale amber tea.
- 🌟 Why This Formula Works Miracles:🧪 Slight Soil Acidity: Christmas Cacti thrive in slightly acidic soil (pH 5.5 – 6.2). Coffee grounds provide a natural, mild acid boost.
- 🌿 Rich Nitrogen & Minerals: Compost tea introduces living soil microbes, nitrogen, potassium, and magnesium for lush foliage growth.
- 💧 Safe & Natural: Gentle on young root systems without the risk of synthetic chemical burns.📅 Application Frequency: Feed your plant with this brown liquid solution once every 3–4 weeks during active growth in spring and summer.
🌺 Phase 5: How to Trigger Explosive Winter BloomingTo turn your bushy, full plant into a stunning mass of vibrant flowers by Christmas, follow this light and temperature trick starting in early autumn:🌙 12–14 Hours of Darkness: Place the plant in complete darkness for 12 to 14 hours every night for 6 consecutive weeks.
- ❄️ Cool Night Temperatures: Keep night temperatures around 55°F to 65°F (12°C – 18°C).
- 💧 Reduce Watering: Allow the top 1 inch of soil to dry out between light waterings during this dormancy phase.
- ⏱️ Quick Summary Timeline🗓️ Weeks 1–2: Callusing and container planting.
- 🗓️ Weeks 3–6: Root establishment in bright, indirect light.
- 🗓️ Months 2–6: Active vegetative growth fed monthly with Compost-Coffee Tea.🗓️ Months 7–8: Dark/cool night regimen to force massive bloom buds!
Happy Planting! 🌸🌵