🟢It was a cold, rainy Sunday morning, and Hannah was feeling overwhelmed. The fast pace of the week had left her exhausted, and all she wanted was a calm, cozy morning to reset. As she sat wrapping herself in a warm blanket, a soft knock came at her door.
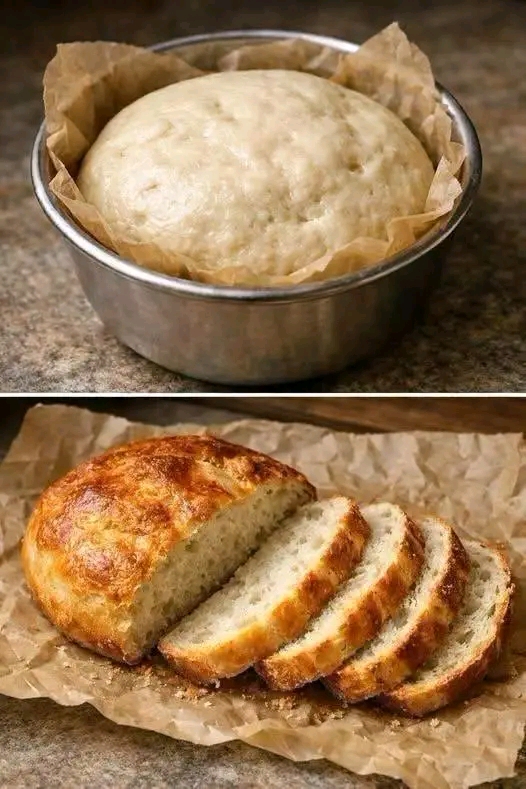
🟢It was her neighbor, Eleanor, holding a brown paper package tied with twine. As Hannah opened it, the comforting aroma of fresh, warm baking filled her home. Inside was a loaf of golden-brown, rustic artisan bread with a crackly crust, sliced neatly to reveal a tender, airy interior.
🟢Along with the bread was a handwritten card: “Consider this my little gift of comfort to you. It took almost no effort to make—just a little time and love. Enjoy it warm with butter!” 🌸
🟢Hannah took a warm slice, spread a thin layer of butter over it, and took a bite. The outer crust gave a loud, satisfying crunch, while the crumb inside was soft, chewy, and rich with deep, fermented flavor. That simple gift transformed her entire day into a peaceful, rewarding experience.
🟢Inspired by Eleanor’s thoughtful gesture, this article brings you the exact recipe for The Gift of Comfort: Artisan No-Knead Crusty Bread. Baking your own bread doesn’t require hours of intense kneading or specialized baker skills—just simple ingredients and a little patience! 🌾✨
Why This Artisan No-Knead Bread Is Extraordinary 🌟
🟢Homemade bread often seems intimidating, but this no-knead method simplifies the process while delivering bakery-quality results right at home.
🟢Here is why this recipe is a favorite for food lovers and home bakers:
- No Kneading Required: High hydration and slow fermentation do all the heavy lifting, developing natural gluten without physical effort. 🥣
- Crispy Golden Crust: Baking inside a preheated Dutch oven creates steam, resulting in that iconic, blistered, crackly crust. 🥖
- Simple Pantry Ingredients: Requires only 4 basic staples: flour, water, yeast, and salt. 🛒
- Versatile & Adaptable: Excellent for morning toast, dipping in olive oil, pairing with warm soups, or gifting to family and friends. 🎁
Master Ingredients & Kitchen Tools 🛒
🟢To achieve the ideal rise and crust shown in the picture, maintaining the right flour-to-water ratio and using proper parchment paper during baking are key.
Ingredients & Tools Overview Table 📝
| Category | Component / Item | Quantity | Purpose & Baker’s Notes |
|---|---|---|---|
| Base | All-Purpose or Bread Flour 🌾 | 3.25 cups (400g) | Bread flour produces a chewier texture; all-purpose works great too. |
| Leavening | Instant Dry Yeast 🧫 | 1/2 tsp (2g) | A small amount is used for slow, overnight fermentation. |
| Flavor | Fine Sea Salt 🧂 | 1.5 tsp (8g) | Enhances flavor and regulates yeast activity. |
| Hydration | Luke-warm Water 🥛 | 1.5 cups (360ml) | Around 100°F (38°C) to gently activate the yeast. |
| Equipment | Parchment Paper 📜 | 1 large sheet | Prevents sticking and makes transferring dough effortless. |
| Equipment | Dutch Oven or Heavy Pot 🍲 | 3 to 5 Quarts | Traps steam during baking to form the golden crust. |
Step-by-Step Baking Guide 👩🍳
🟢Follow these straightforward steps to bake a gorgeous, golden-crusted loaf:
Step 1: Mix the Dough (2 Minutes) 🥣
🟢In a large glass or ceramic bowl, whisk together the flour, instant yeast, and sea salt. Pour in the lukewarm water and stir with a wooden spoon or spatula until a shaggy, sticky dough forms. Make sure no dry flour remains.
Step 2: Slow Overnight Fermentation 😴
🟢Cover the bowl tightly with plastic wrap or a damp towel. Let it sit at room temperature (around 70°F / 21°C) for 12 to 18 hours. During this rest period, the dough will double in size, rise, and form small bubbles on top, as shown in the top photo! 🫧
Baker’s Tip: Slow fermentation allows enzymes to break down starches into natural sugars, creating complex, sourdough-like flavors with zero effort! 💡
Step 3: Shape the Loaf & Preheat 🍲
🟢Place a sheet of parchment paper inside a round bowl. Scrape the sticky dough onto the parchment paper and gently fold the edges over to form a smooth ball. Cover with a towel and let rest for 30 minutes.
🟢While the dough rests, place your empty Dutch oven with its lid on inside the oven. Preheat to 450°F (230°C) for 30 minutes until piping hot.
Step 4: Bake to Golden Perfection 🥖
🟢Carefully remove the hot Dutch oven. Use the edges of the parchment paper to lift the dough and drop it directly into the hot pot. Cover with the lid and bake for 30 minutes. Then, remove the lid and bake for an additional 12 to 15 minutes until the crust becomes deep golden brown and crispy!
🟢Remove from the oven and let the bread cool on a wire rack for at least 20 minutes before slicing.
Comprehensive Nutritional Breakdown 📊
🟢This homemade loaf contains no preservatives, sugar, or added fats—just pure, wholesome grains! (Estimates based on 10 slices per loaf.)
Nutrition Value Table (Per Slice) 📈
| Nutrient Metric | Value Per Serving | % Daily Value |
|---|---|---|
| Calories 🔥 | 145 kcal | — |
| Total Fat 🥑 | 0.5 g | 1% |
| Sodium 🧂 | 350 mg | 15% |
| Total Carbohydrates 🌾 | 30 g | 11% |
| Dietary Fiber 🥗 | 1.2 g | 5% |
| Protein 💪 | 4.5 g | 9% |
Pro Tips for Baking Success 💡
- How to Get a Crispier Crust: Allow the bread to cool completely on a wire rack before cutting. Slicing too early traps steam inside and softens the crust! 🌬️
- Adding Custom Flavors: Fold in 1/2 cup of shredded cheddar cheese, fresh rosemary, or roasted garlic into the flour before adding water. 🧀🧄
- Freezing & Storing: Store leftovers in a paper bag for up to 2 days. To freeze, slice the loaf completely and freeze in an airtight bag for up to 3 months. Toast slices directly from frozen! 🧊