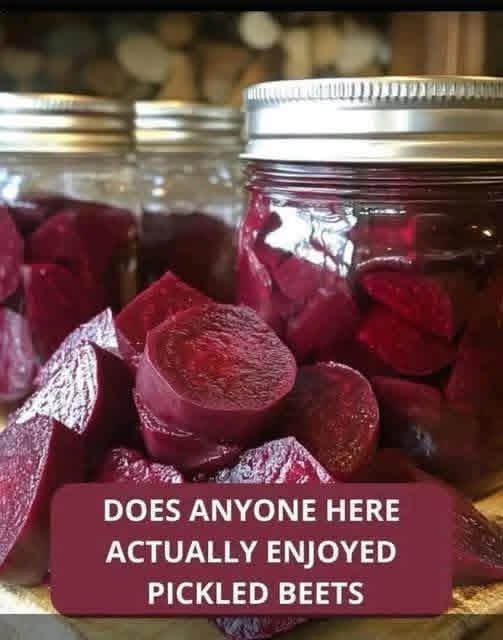
✓For generations, home cooks have relied on the art of pickling to preserve the vibrant flavors and dense nutritional value of fresh summer harvests. Among all pantry staples, few items stand out quite like a glass jar of dark, crimson pickled beets. Despite the playful question posed by skeptics—”Does anyone actually enjoy pickled beets?”—the answer among food enthusiasts, culinary historians, and health-conscious eaters is a resounding yes.🛡️
✓When prepared correctly, pickled beets are far from the harsh, overly acidic canned foods found on grocery store shelves. Instead, they represent a harmonious balance of earthy root flavors, sweet sugar undertones, and a sharp, refreshing vinegar bite. Beyond their irresistible flavor profile, pickled beets serve as a stunning visual element that brightens up salads, charcuterie boards, and classic side dishes. This comprehensive guide will walk you through everything you need to know about crafting the perfect batch of homemade pickled beets from scratch.❣️
Why You Should Make Pickled Beets at Home
- Unmatched Flavor & Texture: Store-bought versions often lack depth and can be overly soft. Homemade pickling preserves a satisfying, tender-crisp bite alongside a custom-balanced brine.
- Nutritional Powerhouse: Beets are naturally rich in essential nutrients, including folate, potassium, fiber, and powerful antioxidants known as betalains. Pickling allows you to preserve these benefits for months.
- Long Shelf Life: Whether you opt for a quick refrigerator method or traditional water-bath canning, you can enjoy the fruits of your labor long after beet season has passed.
- Zero Food Waste: Whole beets—from their deep red roots to their sweet brine—can be utilized across various recipes in your kitchen.
Essential Ingredients and Equipment
✓To achieve the ideal balance of earthy, sweet, and tangy notes, select fresh, high-quality ingredients:
The Core Ingredients:
- 3 lbs Fresh Medium Beets: Choose firm, smooth-skinned beets of similar size to ensure even cooking. Deep red or ruby varieties produce the classic heirloom look shown in mason jars.
- 1 ½ cups White Distilled Vinegar (5% Acidity): Essential for safe preservation and delivering that clean, sharp pickling tang. Apple cider vinegar can also be used for a fruitier profile.
- 1 ½ cups Water: Dilutes the vinegar to create a balanced brine that isn’t overwhelmingly sour.
- 1 cup Granulated Sugar: Cuts through the acidity of the vinegar and enhances the natural sweetness of the root vegetable.
- 1 tbsp Coarse Pickling Salt (or Kosher Salt): Pure salt without added iodine prevents the brine from becoming cloudy.
- Whole Warm Spices (Optional): 1 cinnamon stick, 4-5 whole cloves, and 3-4 allspice berries wrapped in cheesecloth add a nostalgic, old-fashioned aroma.
Necessary Kitchen Gear:
- Large stockpot (for boiling beets)
- Mason jars with fresh lids and bands
- Kitchen towel or paper towels (for peeling)
- Medium saucepan (for brine)
Step-by-Step Preparation Guide
Step 1: Cook and Peel the Beets
- Prep the Greens: Trim the beet greens, leaving about 1 inch of the stem and the taproot intact. Leaving these on prevents the beets from “bleeding” out their rich juice and nutrients during boiling.
- Boil Until Tender: Place the unpeeled beets in a large pot, cover with cold water, and bring to a rolling boil over medium-high heat. Reduce heat and simmer for 30 to 45 minutes, depending on size, until a fork slides easily into the center.
- Cool and Slip the Skins: Drain the cooked beets and immediately transfer them to an ice water bath. Once cool enough to handle, use your thumbs or a paper towel to slide the skins off effortlessly. Cut off the stem and root ends.
Step 2: Slice or Cube
Slice the peeled beets into ¼-inch thick rounds, or cut them into bite-sized wedges/cubes as pictured. Cubing allows the brine to penetrate deep into the fibers, delivering maximum flavor in every bite.
Step 3: Prepare the Sweet & Tangy Brine
- In a medium saucepan, combine the vinegar, water, granulated sugar, pickling salt, and optional spice bag.
- Bring the mixture to a boil over medium heat, stirring continuously until the sugar and salt dissolve completely.
- Reduce heat and let the liquid simmer gently for 5 minutes to infuse the spices, then remove the spice bag.
Step 4: Jar and Steep
- Pack the prepared beet chunks tightly into clean, hot mason jars, leaving about ½ inch of space at the top.
- Carefully ladle the hot liquid brine over the beets, completely submerging them while maintaining the headspaces.
- Tap the jars gently on a wooden counter to release any trapped air bubbles. Wipe the rims clean with a moist cloth, attach the lids, and tighten the bands fingertip-tight.
Storage Options: Refrigerator vs. Canning
- Refrigerator Method (Quick Pickling): Allow the filled jars to cool to room temperature on the counter, then store them in the refrigerator. Let them cure for at least 24 to 48 hours before eating so the flavors can fully develop. They will keep well chilled for up to 3 to 4 weeks.
- Water-Bath Canning (Long-Term Pantry Storage): For room-temperature storage lasting up to 1 year, process filled jars in a boiling water-bath canner for 30 minutes (adjusting time for altitude). Ensure the lids seal properly before storing jars in a cool, dark place.
Creative Ways to Serve Pickled Beets
✓Pickled beets are far more versatile than a simple standalone side dish. Try incorporating them into these culinary ideas:
- Goat Cheese & Walnut Salad: Toss sliced pickled beets over a bed of fresh arugula, crumbled goat cheese, roasted walnuts, and a drizzle of olive oil.
- Charcuterie Boards: Place a bowl of cubed pickled beets alongside aged cheeses, cured meats, and crusty bread to add a sharp, palate-cleansing contrast.
- Pickled Beet Eggs: Once you finish the beets, do not discard the deep red brine! Hard-boil peeled eggs and submerge them in the leftover juice for 24 hours to create vibrant pink, tangy pickled eggs.
Final Thoughts
✓The next time someone asks if people actually enjoy pickled beets, offer them a sample from a freshly opened homemade jar. The combination of sweet earthiness, sharp vinegar brine, and tender texture makes this traditional preservation recipe a timeless winner for every food lover’s kitchen.🍠