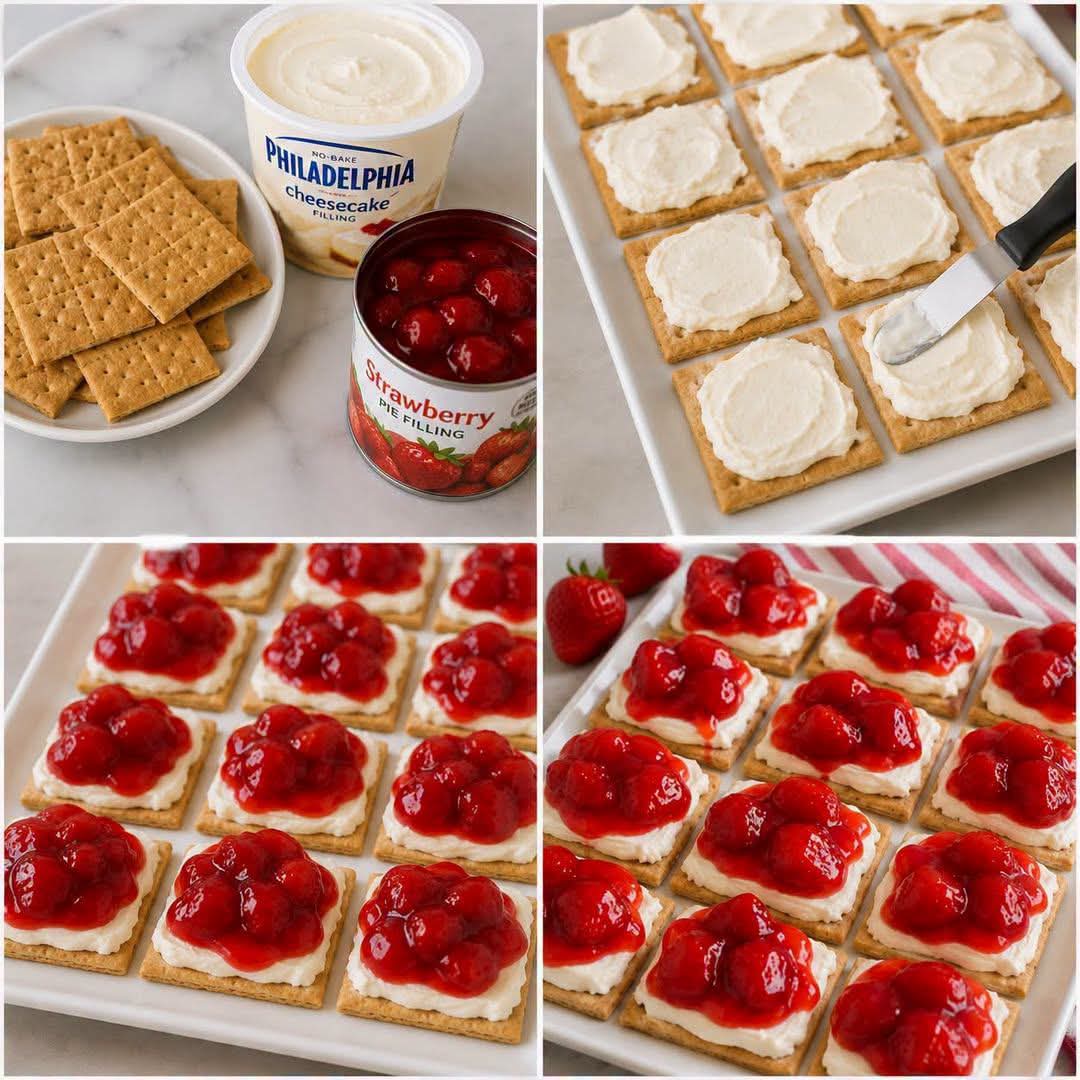
Craving a rich, velvety cheesecake but short on time, energy, or baking confidence? ⏰🍰 Say goodbye to complex water baths, springform pans, cracked tops, and hours of oven baking! 🚫🔥 No-Bake Strawberry Cheesecake Bites are the ultimate lazy-day secret weapon for dessert lovers, party hosts, and busy families alike 🍓✨.
By combining crisp Graham crackers, fluffy Philadelphia no-bake cheesecake filling, and sweet strawberry topping, these bite-sized treats deliver 100% of classic cheesecake satisfaction with zero hassle 🥳💫. Whether hosting a summer backyard BBQ, preparing a last-minute party platter, or indulging late-night sweet cravings, this effortless recipe will steal the show every single time! 🍓❤️🛡️
🍓 Why You’ll Fall in Love with Cheesecake Bites 🍰✨
Classic baked cheesecake requires precise temperatures, careful cooling, and hours of chilling in the refrigerator ⏳. These mini bite-sized squares revolutionize traditional dessert making!
Top Reasons This Recipe Rules Supreme:
- Zero Oven Required 🚫🔥: Keep your kitchen cool during warm summer months—100% no-bake assembly!
- 10-Minute Assembly ⏱️⚡: Requires only 3 main store-bought ingredients and under 10 minutes of hands-on prep time.
- Perfect Portion Control 📐✨: Individual bite-sized crackers make serving effortless—no messy slicing or sticky cake servers needed.
- Kid-Friendly & Mess-Free 👶🍓: A fun, foolproof food project that kids and beginners can assemble independently.
📊 Comprehensive Comparison: Mini Bites vs. Traditional Baked Cheesecake
To appreciate how fast and convenient these mini cheesecake bite squares are, examine this side-by-side recipe comparison 📋👇:
| Feature / Metric 🛡️ | No-Bake Mini Cheesecake Bites 🍓✨ | Traditional Baked Cheesecake 🎂🔥 |
|---|---|---|
| Preparation Time | 5 to 10 minutes total | 30 to 45 minutes prep time |
| Bake Time | 0 Minutes (No oven needed) 🚫 | 60 to 90 minutes in oven |
| Chill Time Needed | Ready immediately (or chill 15 mins) | 6+ hours (or overnight) |
| Required Equipment | Spatula & serving platter 🍽️ | Springform pan, mixer, water bath |
| Serving Convenience | Grab-and-go finger food 🤲 | Requires careful slicing & plating |
| Risk of Failure | Zero (Foolproof assembly) 🛡️ | High (Risk of cracks, sinking, overbaking) |
🛒 Key Ingredients & Tools Needed 🧺✨
Achieving bakery-quality presentation requires just three accessible ingredients from the local supermarket grocery aisle 🛒👇:
1. The Crust Base 🌾
- Graham Crackers: 1 box of honey or cinnamon Graham crackers. Break them gently along scored lines into uniform rectangular or square bases. Pro-Tip: Ritz crackers or digestives work great for a sweet-and-salty twist!
2. The Creamy Filling 🧀✨
- Philadelphia No-Bake Cheesecake Filling: 1 tub (or homemade no-bake cream cheese frosting blend using cream cheese, powdered sugar, heavy cream, and vanilla extract). Smooth, tangy, and pre-whipped to perfection!
3. The Fruit Topping 🍓🍒
- Strawberry Pie Filling: 1 can of high-quality strawberry pie filling loaded with whole glossy strawberries. Alternative options include fresh sliced strawberries, cherry pie filling, or blueberry compote!
4. Basic Tools 🔪🍽️
- Off-set spatula or butter knife 🔪
- Large rectangular serving tray or platter 🍽️
👩🍳 Step-by-Step Instructions: How to Assemble Like a Pro 📝👇
Follow this straightforward 4-step assembly guide for picture-perfect dessert platters 📋✨:
Step 1: Lay Out the Biscuit Bases 🌾🍽️
Carefully break the Graham crackers along their perforated lines into individual square portions. Arrange them in clean, even rows on a large rectangular serving board or platter.
Step 2: Spread the Cream Cheese Layer 🧀✨
Scoop a generous dollop (about 1 to 1.5 tablespoons) of Philadelphia No-Bake Cheesecake Filling onto each Graham cracker square. Use an off-set spatula or small knife to smooth the cream evenly to the edges, creating a flat bed for the fruit topping.
Step 3: Top with Sweet Strawberries 🍓🍯
Using a spoon, carefully scoop 2 to 3 whole strawberries along with a bit of sweet glaze from the pie filling can. Gently place them directly on top of the cream layer on each cracker bite.
Step 4: Chill & Serve! ❄️🎉
Serve immediately for a crisp cracker crunch, or chill the assembled platter in the refrigerator for 15 to 30 minutes to allow the crackers to soften slightly into an authentic soft cheesecake crust texture! 🧁💖
🛡️ Pro-Tips for Presentation & Variation Ideas 💡✨
Take these mini dessert bites to the next level with these creative chef tips 🌟:
- Fresh Berry Upgrade 🍓🌿: Garnish each cheesecake bite with a tiny sprig of fresh mint or a dusting of powdered sugar right before serving!
- Prevent Soggy Crackers 🛡️: If making these several hours ahead for a party, spread a thin layer of melted white chocolate onto the crackers and let it set before adding cream cheese. This acts as a moisture barrier to keep crackers extra crunchy!
- Flavor Customizations 🍫🍋:
- Chocolate Lover’s Twist: Drizzle melted dark chocolate or Nutella over the strawberry topping! 🍫
- Tropical Delight: Swap strawberries for canned mango slices or passionfruit pulp! 🥭
- Lemon Blueberry: Use blueberry pie filling with a touch of fresh lemon zest grated over the cream cheese layer 🍋.
🗓️ Storage & Make-Ahead Guidelines 💡
- Refrigeration: Store leftover assembled bites in an airtight container in the fridge for up to 2 days. The crackers will absorb moisture from the cream, transforming into soft, cake-like layers 🍰!
- Prep Ahead Secret: Keep the components separate and assemble 15 minutes before guests arrive for maximum crunch and fresh presentation 🎉.
🌟 Final Thoughts
Hosting parties and enjoying decadent treats doesn’t require spending hours in front of a hot oven 🚫🔥. With just three simple ingredients—Graham crackers, Philadelphia cheesecake filling, and strawberry topping—you can craft an extraordinary, crowd-pleasing dessert platter in under 10 minutes 🍓🍰🛡️✨. Try this effortless recipe for your next gathering and watch these delicious bites disappear in seconds! 🥳🚀🍓