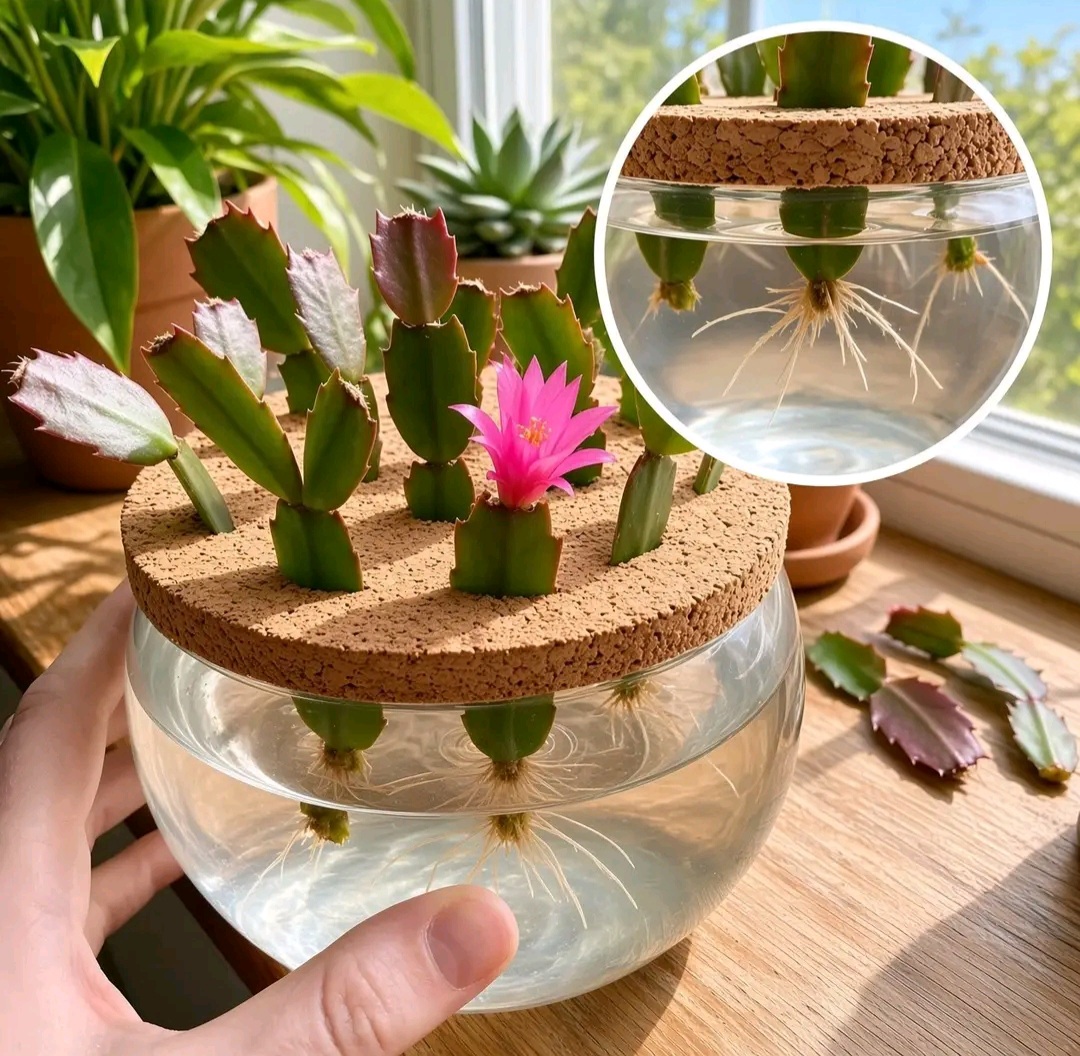
Propagation is one of the most rewarding parts of houseplant care. Watching tiny roots push out from a stem cutting feels like pure magic! 🪄 While many plant enthusiasts propagate holiday cacti (Schlumbergera species, including Thanksgiving and Christmas cacti) directly in soil, water propagation using a floating cork collar is a game-changer.
This creative setup allows you to suspend multiple cladodes (cactus segment cuttings) in water without letting them sink to the bottom or rot from over-submersion. Below is a comprehensive guide to mastering this clean, aesthetically pleasing, and highly effective propagation method! 🪴💧
🌿 Why Water Propagate Holiday Cacti?
Unlike desert cacti, holiday cacti are epiphytic rainforest dwellers native to Brazil. They naturally thrive in humid environments with plenty of indirect moisture. Propagation in water offers several advantages:
- Visual Root Tracking: You can monitor healthy root growth daily through transparent glass. 🔍
- Higher Success Rate: Suspended cuttings avoid rotting from sitting on cold, stagnant vessel bottoms. 🚫🦠
- Vibrant Aesthetics: A clear glass jar filled with green segments, cork support, and clear water adds a modern decor piece to any window sill. 🪟✨
🛠️ Required Materials & Tools
Before starting, gather these simple home items to construct your propagation station:
- Healthy Holiday Cactus Cuttings: Choose plump, vibrant green segments (2–3 segments long per cutting). 🌵
- Clear Glass Bowl or Jar: Allows bright light in and lets you track root development. 🫙
- Natural Cork Lid/Tray: Perforated with small holes to secure the stem bases. 🪵
- Filtered or Distilled Water: Room temperature water prevents thermal shock to sensitive cuts. 💧
- Clean Shears or Scissors: For sharp, sterile cuts if not twisting segments off by hand. ✂️
📊 Quick Overview: Water vs. Soil Propagation
| Feature / Criteria | Water Propagation (Cork Method) 💧 | Traditional Soil Propagation 🪴 |
|---|---|---|
| Visibility | High (100% visible root growth) 👁️ | Low (Hidden under soil mix) 🙈 |
| Rot Risk | Low (When properly elevated by cork) 🛡️ | Medium (Risk from overwatering) 💦 |
| Rooting Speed | Fast (Typically 2–4 weeks) ⚡ | Moderate (3–6 weeks) ⏳ |
| Aesthetics | Decorative glass floating display ✨ | Standard nursery pot look 🪵 |
| Transplant Shock | Moderate (Water roots adjust to soil) 🔄 | Minimal (Already in soil media) 🌿 |
🥼 Step-by-Step Propagation Guide
Step 1: Taking the Cuttings ✂️
Select healthy, pest-free stems from your mature holiday cactus. To harvest, gently twist at the joint where two segment pads meet, or use sterile shears. Aim for cuttings that contain 2 to 4 segments. If you get lucky, a cutting might even produce a surprise bloom during propagation! 🌸
Step 2: Callusing (Crucial Step!) ☀️
Leave your fresh cuttings on a dry paper towel in a warm, shaded spot for 24 to 48 hours. Letting the raw end dry out forms a natural callus that acts as a protective shield 🛡️ against bacterial infections and root rot once submerged in water.
Step 3: Preparing the Floating Cork Support 🪵
Take a sheet or disc of natural cork cut to fit the diameter of your glass bowl. Carefully punch small holes through the cork spaced evenly apart. Insert the base segment of each callused cutting through a hole so it sits upright, hanging below the cork disc.
Step 4: Filling the Vessel 💧
Fill your clear glass jar with room-temperature filtered water. Lower the cork tray onto the rim or water surface. Adjust the water level so that only the bottom 0.25 to 0.5 inches of the lowermost segment dips into the water. Avoid submerging entire segments!
Step 5: Positioning & Light ☀️🪟
Place your propagation station in a spot receiving bright, indirect sunlight. Avoid harsh direct sun, which can overheat the water and scorch delicate stem segments. A bright north- or east-facing windowsill is ideal.
💚 Caring for Your Propagation Station
- Water Maintenance: Change the water every 5 to 7 days to keep oxygen levels fresh and prevent algae build-up. 🧼
- Humidity Boost: Keep the vessel in a warm area (around 18°C–24°C / 65°F–75°F) for maximum root stimulation. 🌡️
- Transplanting: Once white water roots grow 1 to 2 inches long (usually within 3–4 weeks), transfer the cuttings into a well-draining potting mix containing peat, perlite, and orchid bark. 🪵🌱
By following these simple steps, you can expand your plant collection or craft beautiful green gifts for friends and family with ease! Happy planting! 🎉🌵✨