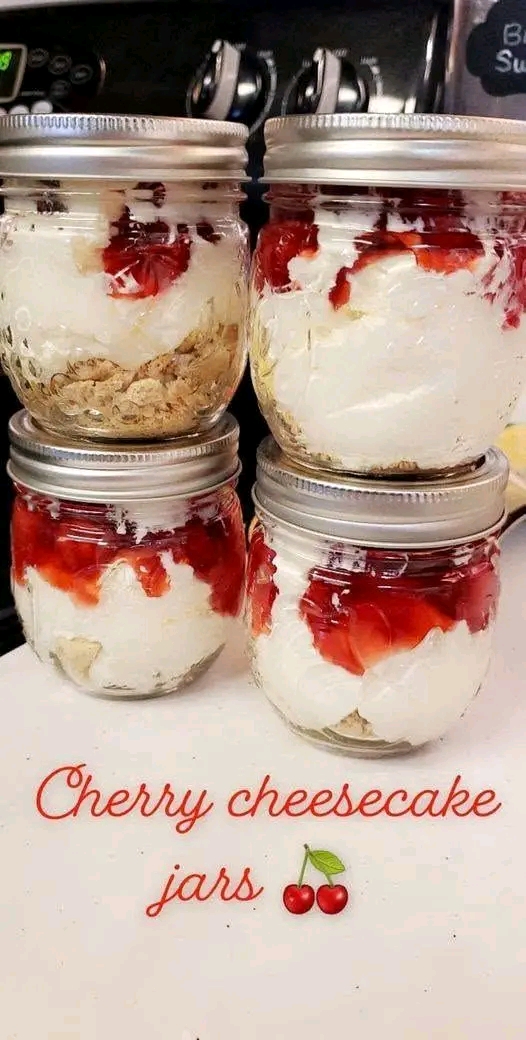
If you are a dessert enthusiast, busy home baker, or meal-prep fan searching for an elegant, single-serving sweet treat, look no further 🍒✨! No-Bake Cherry Cheesecake Jars are the ultimate low-effort, high-reward dessert recipe. By layering buttery crushed graham cracker crusts with a velvety, whipped cream cheese filling and vibrant fruit pie topping inside charming individual mason jars, you create a showstopping dessert that requires zero oven time 🛡️🍰.
These cute portable cheesecake jars hold up fantastically in the refrigerator, making them perfect for summer barbecues, dinner parties, outdoor picnics, or easy weeknight indulgence. Let’s break down the complete master ingredient matrix, step-by-step 4-stage assembly guide, equipment specifications, and professional pastry secrets for guaranteed culinary success!
🛒 Master Ingredient Matrix & Recipe Specifications
Crafting smooth, balanced no-bake cheesecake jars requires pairing a buttery crunchy base, light tang-infused cream filling, and glossy fruit topping 🍒🛡️. Here is your master specifications breakdown 📋✨:
| Recipe Component | Material & Tool Specifications | Culinary Function & Flavor Profile Impact | Recommended Quality Substitutes |
|---|---|---|---|
| Crispy Crust Base 🍪 | Crushed Graham Crackers & Melted Butter | Forms a sweet, nutty foundation that supports creamy layers without going soggy (pictured base). | Digestive Biscuits, Vanilla Wafers, or Biscoff Cookies. |
| Velvety Cream Layer 🧀 | Softened Cream Cheese & Powdered Sugar | Provides rich, tangy, structure-holding cheesecake core whipped to silky perfection (pictured center). | Neufchâtel Cheese, Mascarpone, or Greek Yogurt Blend. |
| Whipped Fluff Element 🍦 | Heavy Whipping Cream or Cool Whip | Injects airy lightness and volume into dense cream cheese, creating a cloud-like texture (pictured center). | Whipped Coconut Cream or Non-Dairy Whipped Topping. |
| Tart Fruit Topping 🍒 | Sweet Cherry Pie Filling / Compote | Adds vibrant ruby red color, juicy fruit texture, and sweet-tart cherry contrast (pictured top). | Strawberry Pie Filling, Fresh Raspberry Compote, or Blueberry. |
| Aromatic Balancers 🍋 | Pure Vanilla Extract & Fresh Lemon Juice | Heightens cheesecake tang while adding floral warmth and bright aromatic acidity. | Almond Extract or Fresh Orange Zest. |
| Serving & Storage Vessels 🫙 | 8 oz Wide-Mouth Mason Jars with Lids | Portions desserts cleanly, seals in freshness, and creates beautiful visible layers (pictured). | Glass Parfait Glasses or Mini Dessert Cups. |
👩🌾 Step-by-Step No-Bake Cherry Cheesecake Jar Masterclass
Follow this simple 4-stage recipe guide to blend your cookie crust, whip silky cream cheese filling, layer mason jars, and top with glossy cherries, exactly as featured in the visual recipe display 🍒✨!
Step 1: Crush & Butter Graham Cracker Crust 🛠️🍪
- Take 1.5 cups of whole graham cracker sheets and place them inside a sealed zip-top bag.
- Use a rolling pin or flat meat mallet to crush crackers into fine, uniform crumbs (or pulse briefly in a food processor).
- Transfer crumbs into a mixing bowl, pour in 4 tablespoons of melted unsalted butter and 1 tablespoon of granulated sugar.
- Stir thoroughly with a fork until mixture resembles moist sand that holds together when pressed.
- Pastry Secret: Pre-toasting cracker crumbs in a dry skillet for 3 minutes before adding butter releases a wonderful nutty aroma that enhances every bite!
Step 2: Whip Silky Cheesecake Filling 🥣🍦
- Place 8 oz of block cream cheese (softened to room temperature) into a large glass mixing bowl.
- Beat cream cheese with an electric hand mixer on medium speed for 2 minutes until completely smooth and lump-free.
- Add 1/2 cup powdered sugar, 1 teaspoon pure vanilla extract, and 1 teaspoon fresh lemon juice, beating for 1 more minute until glossy.
- In a separate bowl, whip 1 cup of cold heavy cream until stiff peaks form (or measure 1.5 cups of thawed Cool Whip).
- Gently fold whipped cream into cream cheese mixture with a rubber spatula in circular motions until smooth, fluffy filling forms.
Step 3: Layer Mason Jars with Precision 🫙📐
- Set out four clean 8 oz wide-mouth mason jars on your countertop (as shown in the featured photo layout).
- Spoon 2 to 3 tablespoons of buttery graham cracker crumbs into the bottom of each mason jar.
- Use the back of a small spoon or wooden pestle to gently pack down crumb bases into smooth, even crust layers.
- Transfer whipped cheesecake filling into a large piping bag (or gallon zip-top bag with the corner snipped off).
- Pipe generous swirls of velvety cheesecake filling over crumb bases, filling each jar about 3/4 full (as clearly displayed in the glass jars).
Step 4: Top with Cherry Filling & Chill 🍒✨
- Open a 21 oz can of sweet cherry pie filling or homemade cherry compote.
- Spoon 2 to 3 tablespoons of cherry pie filling directly over cheesecake layers in each jar, allowing glossy red syrup and whole cherries to settle across edges.
- Seal mason jars tightly with screw-on lids (as shown stacked in the visual presentation).
- Transfer jars to the refrigerator to chill for at least 2 to 4 hours (or overnight) so cream filling sets firm and flavors meld together.
- Serve cold directly from jars with long dessert spoons!
💡 Pro Secrets for Bakery-Quality Cheesecake Jars
- Use Softened Block Cream Cheese: Always use full-fat block cream cheese brought to room temperature before whipping. Tub cream cheese contains extra water that prevents filling from setting firm 🧀!
- Easy Flavor Variations: Swap cherry filling for fresh berries, lemon curd, salted caramel drizzle, or crushed chocolate sandwich cookies for customized flavor profiles 🍓.
- Make Ahead & Storage: These jars stay fresh and delicious in the refrigerator for up to 5 days without crust going soggy, making them the ultimate meal-prep party dessert ❄️.
Incorporate this simple No-Bake Cherry Cheesecake Jar recipe into your dessert prep routine today to enjoy creamy, fruit-filled, single-serving perfection whenever sweet cravings strike! 🍒✨🛡️🍰🫙🍦🌾