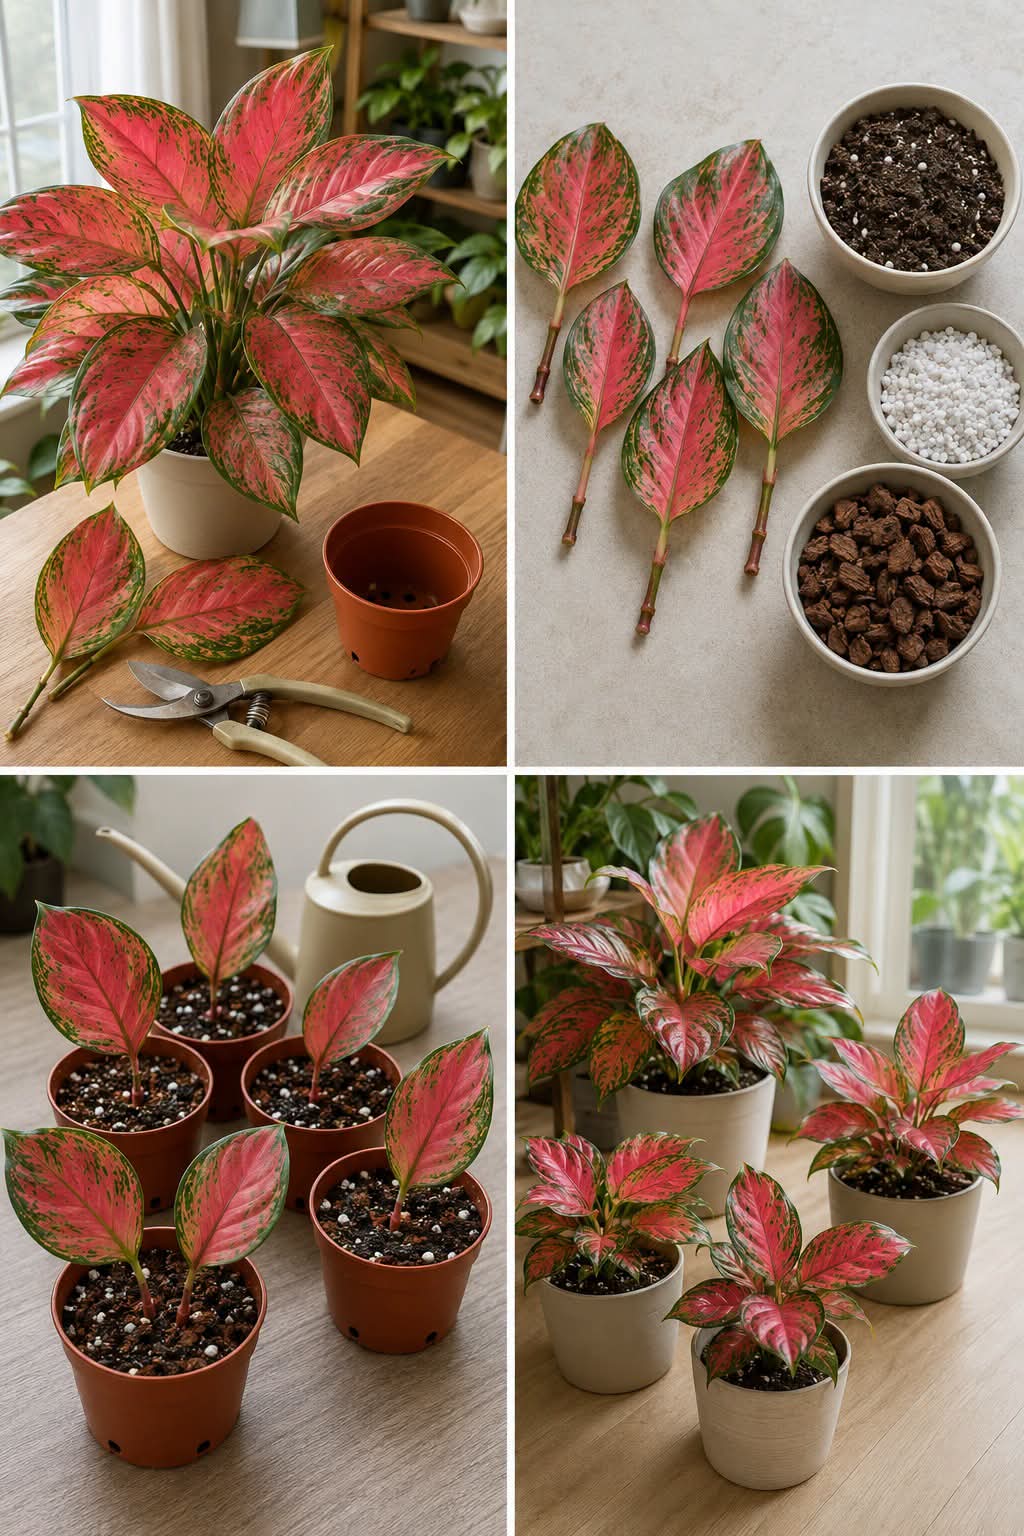
If you are an indoor plant enthusiast, home decorator, or urban gardener looking to multiply your vibrant Red Aglaonema (Aglaonema crete / Siam Aurora), look no further 🪴✨! Red Aglaonema, commonly known as Chinese Evergreen, is famous worldwide for its striking pinkish-red leaf variegation, low-light tolerance, and air-purifying qualities. However, propagating these tropical beauties from individual leaf-stem cuttings requires precise substrate preparation, high-porosity soil amendments, and consistent moisture management 🛡️🌸.
By combining well-aerated potting soil with perlite and pine bark nuggets, you can create a custom rooting environment that prevents stem rot while encouraging rapid adventitious root formation. Let me walk you through the master substrate specifications, a step-by-step 4-panel propagation guide, rooting parameters, and professional botanical care secrets!
🛒 Master Substrate & Propagation Specifications
Propagating Red Aglaonema stem cuttings into individual nursery pots requires balancing organic potting medium, mineral drainage amendments, and controlled humidity 🪴🛡️. Here is your master specifications breakdown 📋✨:
| Propagation Component | Visual & Material Specifications | Botanical Function & Horticultural Impact | Recommended Alternatives |
|---|---|---|---|
| Mother Plant Specimen 🪴 | Mature Red Aglaonema (Siam Aurora) | Source plant featuring dense foliage with vibrant pink-red leaf margins (pictured top-left). | Aglaonema Lady Valentine or Pink Dalmatian. |
| Pruning Tool ✂️ | Stainless Steel Bypass Pruning Shears | Delivers clean, precise stem cuts without crushing soft vascular tissue (pictured top-left). | Sterilized Floral Knife or Razor Blade. |
| Cuttings Prep 🍃 | Stem-Node Cuttings with Petiole | Cleanly severed stems ready for potting mix insertion (pictured top-right). | Tip cuttings with multiple node joints. |
| Potting Soil Base 🪵 | Peat-Based Indoor Potting Soil | Retains moisture and provides organic nutrients for developing roots (pictured top-right bowl). | Coco Coir Substrate or Leaf Mold Mix. |
| Aeration Amendment ⚪ | Horticultural Perlite / Osmocote Granules | Prevents soil compaction and improves oxygen exchange around raw cuts (pictured top-right bowl). | Pumice Granules or Coarse Sand. |
| Drainage Substrate 🧱 | Coarse Pine Bark Nuggets | Enhances drainage speed and keeps media airy to avoid rot (pictured top-right bowl). | Orchid Bark or Expanded Clay (LECA). |
| Nursery Containers 🏺 | Terracotta-Brown Plastic Nursery Pots | Equipped with multiple bottom drainage holes for moisture runoff (pictured bottom-left). | Biodegradable |
👩🌾 Step-by-Step Red Aglaonema Soil Propagation Guide
Follow this simple 4-step professional guide to harvest stem cuttings, blend your custom potting mix, pot individual cuttings, and nurture them into thriving mature plants, exactly as demonstrated in the 4-panel tutorial 🪴✨!
Step 1: Select & Cut Healthy Stems ✂️🍃
- Position your healthy mother Red Aglaonema plant on a clean table under bright, ambient light (as shown in the top-left panel).
- Sterilize your pruning shears using rubbing alcohol or a flame to prevent bacterial transfer.
- Select firm, healthy stems with vibrant red petioles.
- Cut lower stems cleanly near the main plant crown, ensuring each cutting includes a petiole base with intact node tissue.
- Set the freshly cut stems aside on your workbench for 10 to 15 minutes to allow the cut ends to form a light protective callus.
Step 2: Prepare Custom Soil Blend & Cuttings 🪵⚪
- Prepare your substrate components into separate bowls (as featured in the top-right panel): peat potting mix, white perlite, and coarse pine bark.
- In a clean mixing bucket, blend 2 parts peat potting mix, 1 part perlite, and 1 part coarse pine bark until thoroughly uniform.
- Horticultural Secret: Adding perlite and pine bark guarantees maximum root aeration, preventing raw stem cuttings from sitting in waterlogged soil which leads to stem rot!
- Inspect your harvested leaf-stem cuttings to ensure the cut ends are clean and free from any bruised tissue.
Step 3: Pot Cuttings into Individual Nursery Pots 🏺🌱
- Take small brown plastic nursery pots equipped with bottom drainage holes (as demonstrated in the bottom-left panel).
- Fill each pot halfway with your custom prepared soil blend.
- Insert one Red Aglaonema cutting vertically into the center of each pot, pressing the stem base 1.5 to 2 inches deep into the soil.
- Backfill with additional potting mix and gently press around the stem base to anchor the cutting securely upright.
- Water thoroughly using a long-spout watering can until water drains freely from the bottom holes.
Step 4: Nurture into Lush Mature Aglaonema Pots 🪴☀️
- Place your freshly potted cuttings in a warm room receiving bright, indirect sunlight (68°F to 80°F / 20°C to 27°C).
- Maintain light moisture in the soil by watering whenever the top inch feels dry to the touch.
- Within 4 to 6 weeks, each cutting will establish a dense root system and begin producing new central leaf shoots.
- Transplant several rooted stems together into larger ceramic pots to create full, bushy Red Aglaonema displays (as captured in the bottom-right showcase)!
💡 Pro Secrets for Aglaonema Propagation Success
- Optional Rooting Hormone: Dip the callused end of each stem cutting into organic rooting hormone powder before potting to accelerate root development 🌸.
- Maintain High Humidity: Place a clear plastic bag loosely over your newly potted cuttings for the first 2 weeks to create a mini-greenhouse that minimizes leaf moisture loss!
- Avoid Direct Sunlight Exposure: Direct harsh sunlight can scorch colorful red leaves and dry out unrooted cuttings quickly ☀️. Keep them in diffused indirect window light for best growth.
Try this simple, reliable soil propagation method today to multiply your Red Aglaonema collection and fill your living space with vibrant red foliage all year round! 🪴✨🛡️