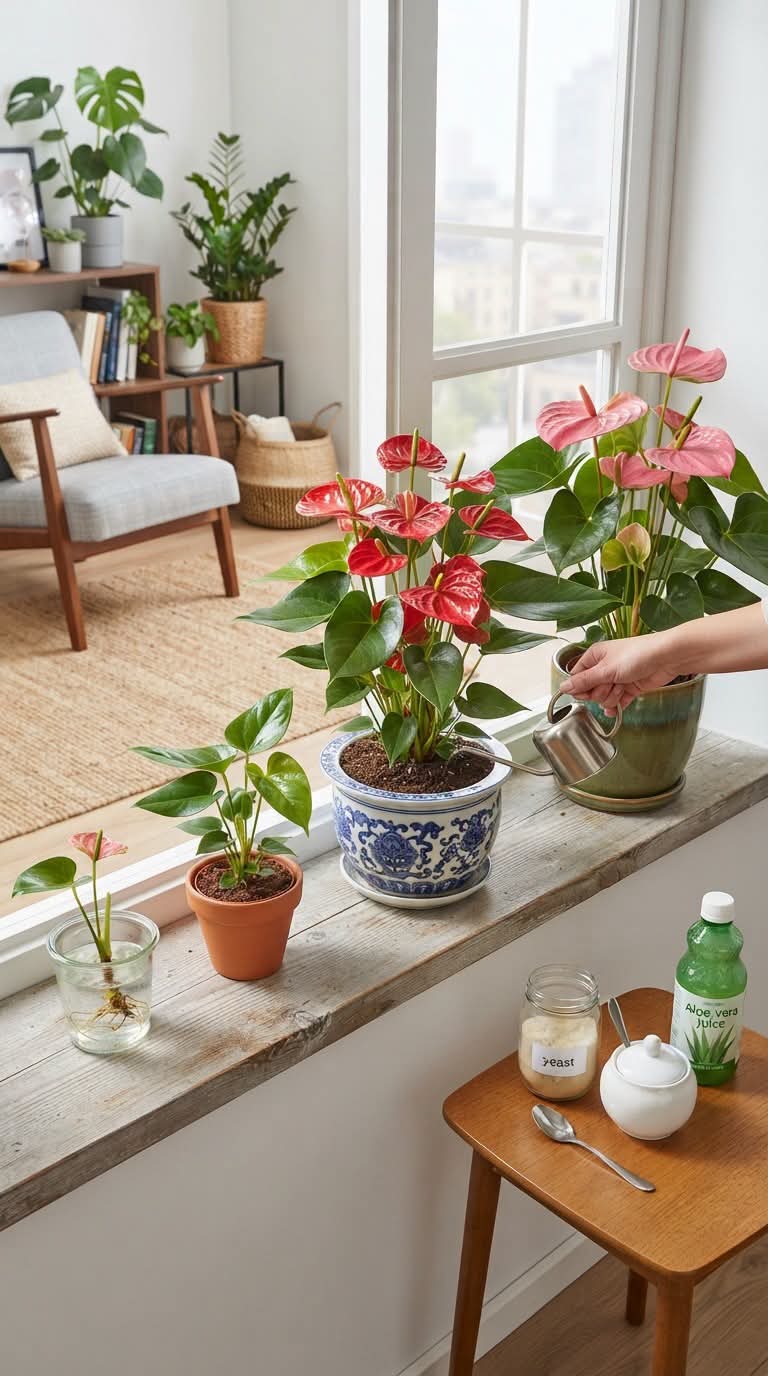
If you are an indoor plant lover, home gardener, or botanical enthusiast seeking to keep your Anthurium (Anthurium andraeanum) blooming with vibrant red and pink spathes year-round, look no further 🌸🌱! Anthuriums—commonly known as Flamingo Flowers or Painter’s Palettes—are renowned for their heart-shaped glossy foliage and colorful, long-lasting spathes. However, encouraging these tropical beauties to produce continuous blooms and maintain deep green leaves indoors requires precise nutrition and proper moisture balance 🏺✨.
While commercial chemical fertilizers can cause mineral buildup in potted soil, natural homemade organic soil boosters made from household ingredients like baker’s yeast and aloe vera juice provide gentle, bio-available enzymes, amino acids, and micro-nutrients 🧪. By combining organic root stimulants with a well-draining potting substrate and bright indirect window light, you can stimulate continuous flower production and healthy root development. Let’s explore the master specifications, step-by-step DIY fertilizer preparation guide, complete maintenance parameters, and professional botanical secrets!
🛒 Master Botanical Setup & Fertilizer Specifications
Cultivating flourishing Anthuriums indoors requires balancing substrate aerating components, natural bio-stimulants, proper container drainage, and ideal lighting conditions 🌸🌱. Here is your master specifications breakdown 📋✨:
| Equipment & Botanical Component | Key Features & Specifications | Botanical Function & Horticultural Impact | Recommended Alternatives |
|---|---|---|---|
| Plant Variety 🌺 | Anthurium Andraeanum (Flamingo Flower) | Features glossy, heart-shaped dark green leaves with bold red and pink flowering spathes (pictured). | Anthurium Clarinervium or Crystallinum. |
| Primary Natural Bio-Stimulant 🍞 | Dry Active Baker’s Yeast | Rich in B-complex vitamins, amino acids, and proteins that accelerate soil micro-flora activity (pictured). | Brewer’s Yeast or Fermented Rice Water. |
| Secondary Hydration Booster 🧴 | Pure Organic Aloe Vera Juice | Contains natural phytohormones (gibberellins and auxins) that stimulate root branching (pictured). | Fresh Aloe Vera Gel or Willow Bark Water. |
| Container & Substrate Setup 🏺 | Ceramic Pot with Drainage / Terracotta | Ceramic with drainage holes holds aerated chunky orchid bark substrate without waterlogging (pictured). | Terracotta Pot or Plastic Nursery Liner. |
| Light Exposure Zone ☀️ | Bright, Indirect Window Light | Drives high photosynthetic activity for continuous spathe development without burning foliage. | Dappled Sunlight or LED Grow Light. |
| Propagation Method 💧 | Water Propagation Glass Jar | Allows quick rooting of Anthurium stem cuttings with aerial nodes in clear water (pictured). | Moist |
👩🌾 Step-by-Step DIY Organic Fertilizer & Anthurium Care Guide
Follow this simple 4-step professional guide to formulate your natural yeast and aloe booster, apply it correctly, and care for your indoor Anthurium collection, exactly as demonstrated in the windowsill garden setup 🌸✨!
Step 1: Formulate the Natural Yeast & Aloe Booster 🍞🧴
- Measure 1 teaspoon of active dry baker’s yeast from your ingredient jar into a small bowl or jug (as featured on the wooden table).
- Add 1 tablespoon of pure organic aloe vera juice and 1 cup of lukewarm filtered water (approx. 85°F to 95°F / 29°C to 35°C).
- Stir the mixture well and let it sit for 15 to 20 minutes until the yeast dissolves and forms a slight froth.
- Horticultural Secret: Lukewarm water activates the living yeast cells, releasing beneficial trace minerals and proteins that help soil microorganisms convert organic matter into plant-ready nutrients!
Step 2: Dilute and Apply to Potted Anthuriums 🫖🌱
- Dilute the activated yeast and aloe mix with an additional 3 cups of room-temperature room water (yielding 1 liter total of gentle fertilizer).
- Using a narrow-spout watering can (as shown in the watering action shot), pour the organic liquid slowly around the base of your potted Anthuriums.
- Ensure the potting medium is evenly moistened until liquid drains out from the bottom drainage holes into the saucer.
- Frequency: Apply this natural organic feed once every 3 to 4 weeks during spring and summer to fuel active blooming cycles!
Step 3: Monitor Propagation and Stem Cuttings 🏺💧
- For propagation, choose a healthy Anthurium stem cutting featuring at least one visible aerial root node.
- Place the cutting into a clear glass jar filled with clean filtered water (as displayed on the far left of the windowsill).
- Change the propagation water every 5 to 7 days to keep oxygen levels fresh and encourage thick, white root branching before transplanting into soil.
Step 4: Environmental Maintenance and Light Setup ☀️🌱
- Position your Anthuriums on a wide wooden windowsill or near an east or west-facing window receiving bright, filtered sunlight (as pictured in the sunlit room layout).
- Wipe the glossy green leaves gently with a damp cloth every few weeks to remove dust build-up and improve light absorption.
- Keep room temperatures warm, ideally between 68°F and 82°F (20°C to 28°C), and avoid cold air draughts near open doors or AC vents.
💡 Pro Secrets for Continuous Anthurium Blooms
- Never Allow Soil to Become Waterlogged: Anthuriums are epiphytic in nature 🌺! Always use an aerated, chunky potting mix containing coarse orchid bark, perlite, and peat moss to prevent root rot.
- Maintain High Ambient Humidity: Anthuriums love high humidity (60%+). Grouping your Anthuriums alongside other houseplants like Monstera or placing a small humidifier nearby prevents crisp, brown leaf tips!
- Prune Faded Spathes Promptly: When a flower spathe turns pale or brown, snip the stem cleanly at the base using sharp, sterilized shears ✂️. This redirects vital plant energy into generating brand-new flowering buds!
Try this easy, highly effective organic yeast and aloe fertilizer recipe today to keep your indoor Anthuriums blooming with rich, vibrant color all year round! 🌸🌱✨