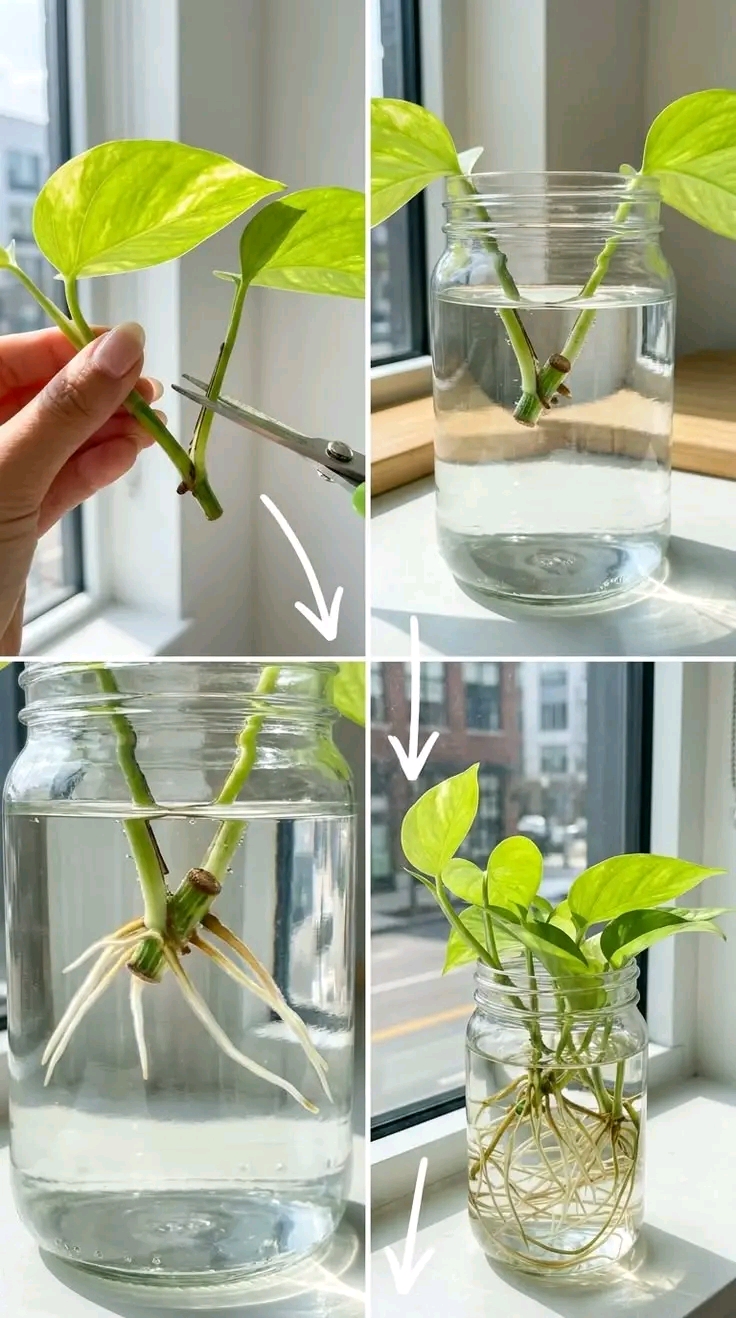
Have you ever looked at your favorite indoor plant and wished you could duplicate it effortlessly across every room in your home? 🏡✨ Transforming a single green vine into a thriving indoor jungle is far easier than most beginner plant parents realize. You do not need an expensive setup, sophisticated greenhouse equipment, or specialized gardening expertise to build a stunning botanical collection right on your window sill! 🪟🌱
In this comprehensive blog post, we will explore an incredibly simple four-step visual guide to multiplying your favorite green foliage using simple household items. ✂️💧 From making precise stem cuts to encouraging rapid root growth, this complete walkthrough will teach you how to master clean stem cutting propagation and keep your houseplants flourishing for years to come. 🛡️🌟
Why You Should Try Home Plant Propagation Today 🌟🌿
Plant propagation is one of the most rewarding and therapeutic hobbies for indoor gardeners. Beyond expanding your plant collection completely for free, this simple technique offers incredible practical and mental health benefits:
- Budget-Friendly Home Decor 💸✨: Grow brand-new plants to decorate living rooms, office desks, and bedrooms without spending money on commercial nurseries.
- Thoughtful Handmade Gifts 🎁🌱: Rooted stem cuttings in decorative glass jars make charming, personalized gifts for friends, family, and fellow plant lovers.
- Easier Root Monitoring 👁️🫙: Cultivating new roots in clear liquid containers allows you to observe daily growth progress and spot potential health issues early.
- Low Maintenance & High Success 🛡️👍: Simple stem cuttings adapt quickly, making this method ideal for beginner plant owners who want guaranteed results.
🛠️ Essential Tools & Setup Checklist
Before making your first cut, gather these essential supplies to ensure maximum cleanliness and healthy growth for your new plant cuttings:
- Healthy Parent Vine 🌿: Select a vibrant, healthy stem with rich foliage and strong brown node bumps.
- Sterilized Pruning Shears ✂️🛡️: Clean your scissors or garden shears with rubbing alcohol to protect vulnerable stem wounds from bacteria.
- Clear Glass Vessel 🫙✨: A simple mason jar, vase, or glass beaker allows natural sunlight to reach developing root zones.
- Fresh Filtered Water 💧☀️: Use room-temperature water free from heavy minerals or excessive chlorine to promote gentle root development.
📊 Complete Phase Breakdown: Stem to Strong Roots
To help you track your plant’s progress over time, here is a detailed, structured comparison of each growth stage featured in the simple visual process above:
| Growth Phase 🏷️ | Primary Action Required 🛠️ | Root & Stem Condition 🌱 | Expected Timeline ⏱️ | Light & Maintenance Care ☀️💧 |
|---|---|---|---|---|
| Phase 1: Precision Cut | Cut 0.5 inches below a node at a 45° angle with clean shears ✂️ | Clean stem cut; brown node clearly exposed 🟤 | Day 1 | Place in bright, indirect light; submerge node fully in water ☀️ |
| Phase 2: Node Activation | Keep the node submerged; refresh container liquid weekly 💧 | Small, firm white root nubs begin emerging 🤍 | Weeks 1 – 2 | Change liquid every 5 to 7 days; keep away from harsh direct sun 🌤️ |
| Phase 3: Root Extension | Top off liquid levels to cover growing root tips 🫙 | 2 to 4 inches of healthy, branching primary roots 🌾 | Weeks 3 – 4 | Maintain consistent ambient warmth and indirect sunlight 🌿 |
| Phase 4: Full Network | Keep in permanent clear liquid culture or transfer to potting mix 🪴 | Dense, intertwined root system filling vessel base 🕸️ | Week 5+ | Add |
✂️ Step-by-Step Practical Propagation Guide
Step 1: Locating the Node & Making a Clean Cut ✂️🌿
The secret behind successful vegetative propagation lies within the node—the raised brown bump or junction along a vine where leaves and aerial roots meet. Adventitious roots only develop from active node tissue, so proper placement is essential.
- Select a healthy, growing vine on your parent plant with multiple vibrant leaves.
- Locate a prominent stem node just underneath a leaf stem junction.
- Using sterilized shears, cut cleanly across the vine about 0.25 to 0.5 inches below the node at a slight angle.
- Remove any lower leaves near the base so they do not sit underwater and rot.
Step 2: Submerging Cuttings in Clear Glass Vessels 🫙💧
Once your cutting is prepped, setting up the growing environment takes only a few seconds:
- Fill your clean glass jar with room-temperature filtered water.
- Lower the stem cutting into the jar so that the node is completely submerged under water, keeping upper leaf blades resting dryly above the container rim.
- Place your jar in a bright location receiving strong indirect sunlight (such as a sunny windowsill protected by sheer curtains). Avoid scorching direct sunlight, which causes overheating and rapid algae blooms.
Step 3: Routine Care & Root Development Monitoring 🌾☀️
During the first few weeks, consistent maintenance will safeguard your cutting against bacteria and stagnation:
- Weekly Liquid Changes 💧: Replace the vessel liquid every 5 to 7 days to maintain high oxygen levels and keep the water sparkling clean.
- Root Progress Inspection 👁️: Within 7 to 14 days, you will notice tiny white root tips poking out directly from the stem node. Over the next month, these will grow into a thick, fibrous web.
Step 4: Long-Term Sustenance or Soil Planting 🪴✨
Once your roots reach 2 to 4 inches in length, you can choose between two long-term care routes:
- Hydroponic Glass Display 🫙: Continue growing your vine directly in clear liquid vessels indefinitely! Add a drop of diluted liquid plant food once a month to supply essential nutrients.
- Potted Soil Transfer 🪴: Plant your rooted cutting into well-draining potting soil mixed with perlite. Keep the soil evenly moist for the first two weeks to help water-adapted roots adjust seamlessly to dirt.
🛡️ Expert Troubleshooting & Prevention Tips
- Slippery, Dark Roots 🍂: Dark, mushy roots indicate rot caused by stagnant water. Trim away affected areas, rinse the healthy white roots, and sanitize the glass container thoroughly before refilling.
- Yellowing Foliage 💛: Shedding an old bottom leaf can be normal as the plant redirects energy to new roots. However, widespread yellowing usually signals excessive direct sunlight or insufficient ambient light.
- Green Algae Accumulation 🟢: Algae forms naturally when sunlight meets nutrient-rich water. Simply wipe down the inner glass walls during your routine weekly water refresh.
By following this simple, step-by-step tutorial, you can easily turn a single green vine into dozens of stunning, healthy houseplants to fill every corner of your home! Happy growing! 🌱✨💚