Indoor gardening has evolved into one of the most rewarding home hobbies in modern lifestyle culture. Transforming a living room, home office, or quiet bedroom into a vibrant botanical sanctuary does not merely elevate your interior décor—it connects you with nature, improves indoor atmosphere quality, and boosts daily mental well-being! 🪴🧘♂️✨
However, keeping indoor greenery vibrant, robust, and pest-free often feels intimidating to beginner plant lovers and busy working professionals. You might ask yourself: How often should I water? What kind of soil works best? How do I propagate my favorite stems? 💧🔍
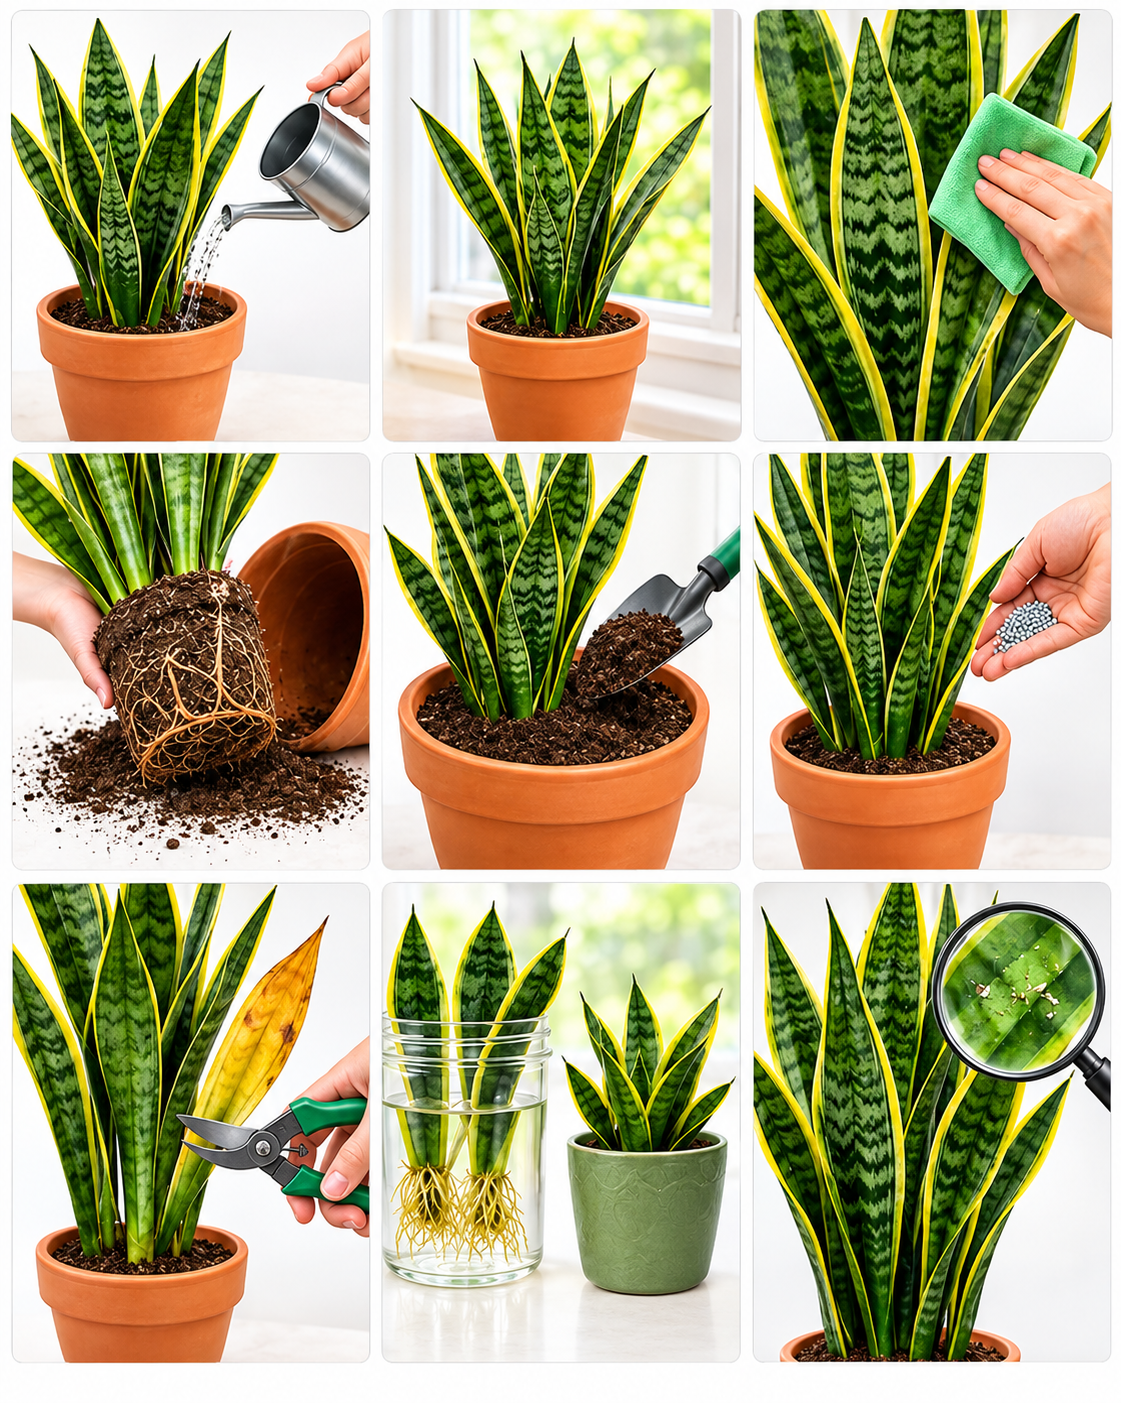
The standard visual guide shown above illustrates nine foundational care practices that turn even the most hesitant beginner into a confident plant parent. Below is a comprehensive breakdown covering every single essential step in detail! 🍃👇
Complete Plant Care & Maintenance Summary 📊✨
Before diving into the detailed step-by-step breakdown, review this quick reference guide to master the main routine elements:
| Step / Focus Area 🎯 | Primary Care Action 🛠️ | Recommended Frequency / Tip 💡 | Key Benefit 🛡️ |
|---|---|---|---|
| 1. Controlled Watering 💧 | Water thoroughly near the root base. | Allow top soil to dry completely between cycles. | Prevents moisture buildup and root damage. |
| 2. Sunlight Placement ☀️ | Position near bright, indirect light sources. | Avoid harsh midday direct sunlight. | Maximizes photosynthetic energy safely. |
| 3. Leaf Cleaning 🧼 | Wipe foliage gently with a damp microfiber cloth. | Every 2 to 3 weeks. | Removes dust to boost light absorption. |
| 4. Repotting Assessment 🪴 | Inspect root structure and pot size capacity. | Every 1 to 2 years or when root-bound. | Gives roots room to expand and absorb nutrients. |
| 5. Fresh Soil Aeration 🪵 | Add fresh, porous potting mix with good drainage. | During repotting or seasonal refresh. | Promotes oxygen flow around subterranean roots. |
| 6. Balanced Feeding 🧪 | Apply slow-release fertilizer granules gently. | Spring and summer growing seasons. | Provides steady nutritional support. |
| 7. Pruning Care ✂️ | Snip yellowing, damaged, or aging leaves. | Whenever damaged foliage appears. | Redirects energy toward healthy new growth. |
| 8. Water Propagation 🥛 | Root healthy leaf cuttings in clear glass water. | Change water weekly until roots form. | Grows brand new plants effortlessly at zero cost. |
| 9. Pest Monitoring 🔍 | Inspect leaves closely with a magnifying glass. | Weekly inspection during routine checks. | Catches |
9 In-Depth Steps to Master Indoor Plant Maintenance 🌿🛡️
Step 1: Deep & Mindful Watering Techniques 💧🛑
Watering seems simple, but it remains the single biggest hurdle for houseplant enthusiasts!
- Avoid Overwatering: Always check soil moisture before pouring. Insert your finger 1 to 2 inches into the potting medium. If it feels dry and cool, it is time to water!
- Target the Base: Direct your watering can spout toward the soil around the base rather than pouring water directly into the center crown. This keeps excess moisture from sitting on foliage and rotting tender stems.
- Drainage First: Always use pots equipped with bottom drainage holes. Allow excess water to flow out completely into a saucer, then discard the standing water after 15 minutes!
Step 2: Optimizing Light Exposure for Maximum Energy ☀️🪟
Light is the primary food source for your green companions through photosynthesis!
- Indirect Bright Light: Most tropical indoor foliage thrives best in bright, indirect sunlight, such as a spot near an east-facing or shaded south-facing window.
- Protect From Sunburn: Direct, intense sunlight can cause permanent brown scorch marks on leaf surfaces. If your window receives harsh direct rays, filter the light using thin sheer curtains!
Step 3: Gentle Leaf Dusting & Hygiene Routine 🧼✨
In a typical indoor environment, fine household dust gradually settles onto horizontal and vertical leaf surfaces.
- Why Clean Leaves? Dust layers block tiny leaf pores (stomata) and obscure sunlight, drastically reducing your plant’s ability to photosynthesize effectively!
- How to Clean: Take a soft, damp microfiber cloth or sponge and gently wipe down both sides of each individual leaf blade. This simple 2-minute habit restores natural shine and keeps foliage breathing freely!
Step 4: Assessing Root Health & Repotting Needs 🪴🔄
As your plant matures, its root system continuously expands to search for stability and water.
- Signs of Root-Bound Soil: When roots start circling the bottom inside of the pot or growing tightly out through drainage holes, the plant is root-bound!
- Gently Freeing Roots: Carefully slide the plant out of its original container. Gently loosen tightly bound exterior roots with your fingers to help them branch outward once placed in a larger home.
Step 5: Refreshing Soil with Superior Drainage Mixes 🪵🪴
Soil is much more than just dirt—it is an anchor, nutrient reservoir, and air passageway!
- Soil Composition: Choose a high-quality interior potting mix rich in organic matter, combined with perlite, coarse sand, or bark chunks.
- Promoting Root Respiration: Lightweight, well-aerated soil prevents dense compaction. Compacted soil holds excess water like a heavy sponge, cutting off root oxygen and inviting fungal decay.
Step 6: Sustained Nutrition with Slow-Release Feeding 🧪✨
Potted indoor soil eventually runs out of essential chemical nutrients over time as plants absorb them.
- Controlled Feeding: Apply high-quality slow-release fertilizer granules or diluted liquid plant food during the active spring and summer growing periods.
- Avoid Over-Fertilizing: Never exceed recommended dosages! Excessive chemical fertilizer can burn root tips, turn leaf margins brown, or cause salt build-up in the soil.
Step 7: Strategic Pruning & Energy Conservation ✂️🍂
Leaves naturally age, turn yellow, or suffer minor mechanical damage over their life cycle.
- Why Prune? Dying leaves continue to drain precious water and metabolic energy away from the healthy core structure of the plant.
- Proper Method: Using clean, disinfected pruning shears or sharp scissors, clip away discolored or damaged leaves right down near the main soil base. This immediate cleanup redirects vital nutrients toward fresh new shoots!
Step 8: Simple Propagation in Water 🥛🌱
One of the most thrilling parts of indoor gardening is multiplying your collection for free or sharing cuttings with friends!
- Taking Cuttings: Select strong, healthy leaves or stems and slice them cleanly using sterilized tools.
- Rooting in Water: Place the base of the cuttings into a clear glass jar filled with fresh, clean water. Position the jar in indirect sunlight and replace the water weekly. Within a few weeks, brand-new white root networks will develop, ready for potted soil!
Step 9: Regular Inspection & Pest Protection 🔍🛡️
Prevention is always better than treatment when dealing with common houseplant pests like spider mites, mealybugs, scale, or thrips!
- Inspect Closely: Regularly inspect leaf undersides, stem junctions, and young growth tips using a small magnifying glass.
- Early Action: Catching a tiny pest outbreak early allows you to wipe down leaves with insecticidal soap or neem oil before pests damage the full foliage display!
Final Thoughts on Elevating Your Green Space 🏡✨
Indoor gardening is a rewarding journey of observation, patience, and simple daily care routines. By mastering balanced watering, providing adequate light, refreshing rich soil, and keeping foliage clean and protected, you ensure that your indoor botanical haven stays bright, healthy, and growing strong for years to come! 🌿💚🥳