Orchid Propagation Guide: Growing Keiki Plantlets using Garlic Infused Water
Propagating orchids (such as Phalaenopsis) from spend flower spikes is one of the most rewarding methods to multiply your plant collection. Garlic possesses natural antibacterial, antifungal, and antiseptic properties due to its rich allicin content. Using a natural garlic water infusion protects vulnerable stem nodes from rot while creating a high-humidity environment that stimulates latent buds to sprout into new baby orchids, known as Keikis.
1. The Science Behind Garlic-Water Orchid Propagation
Using spent orchid flower stems combined with garlic infusion creates optimal conditions for plantlet regeneration:
- Antifungal Protection: Raw garlic guards exposed stem cuts against stem rot, mold, and pathogens during prolonged water exposure.
- Node Activation: Each segment on a flower spike contains dormant nodes capable of forming a new offset (Keiki) under correct humidity and temperature.
- Controlled Humidity Container: Enclosing stem cuttings inside a capped transparent jar maintains 90%+ humidity, accelerating aerial root formation.
2. Step-by-Step Orchid Stem Propagation Process
Required Materials:
- Healthy spent orchid flower spike (green stem)
- 3–4 cloves of fresh garlic
- 1 pint (500 ml) of warm water
- Sterile pruning shears or sharp scissors
- Clean glass jar with lid or plastic cover
- Orchid bark medium and transparent potted cup (for final repotting)
Step-by-Step Instructions:
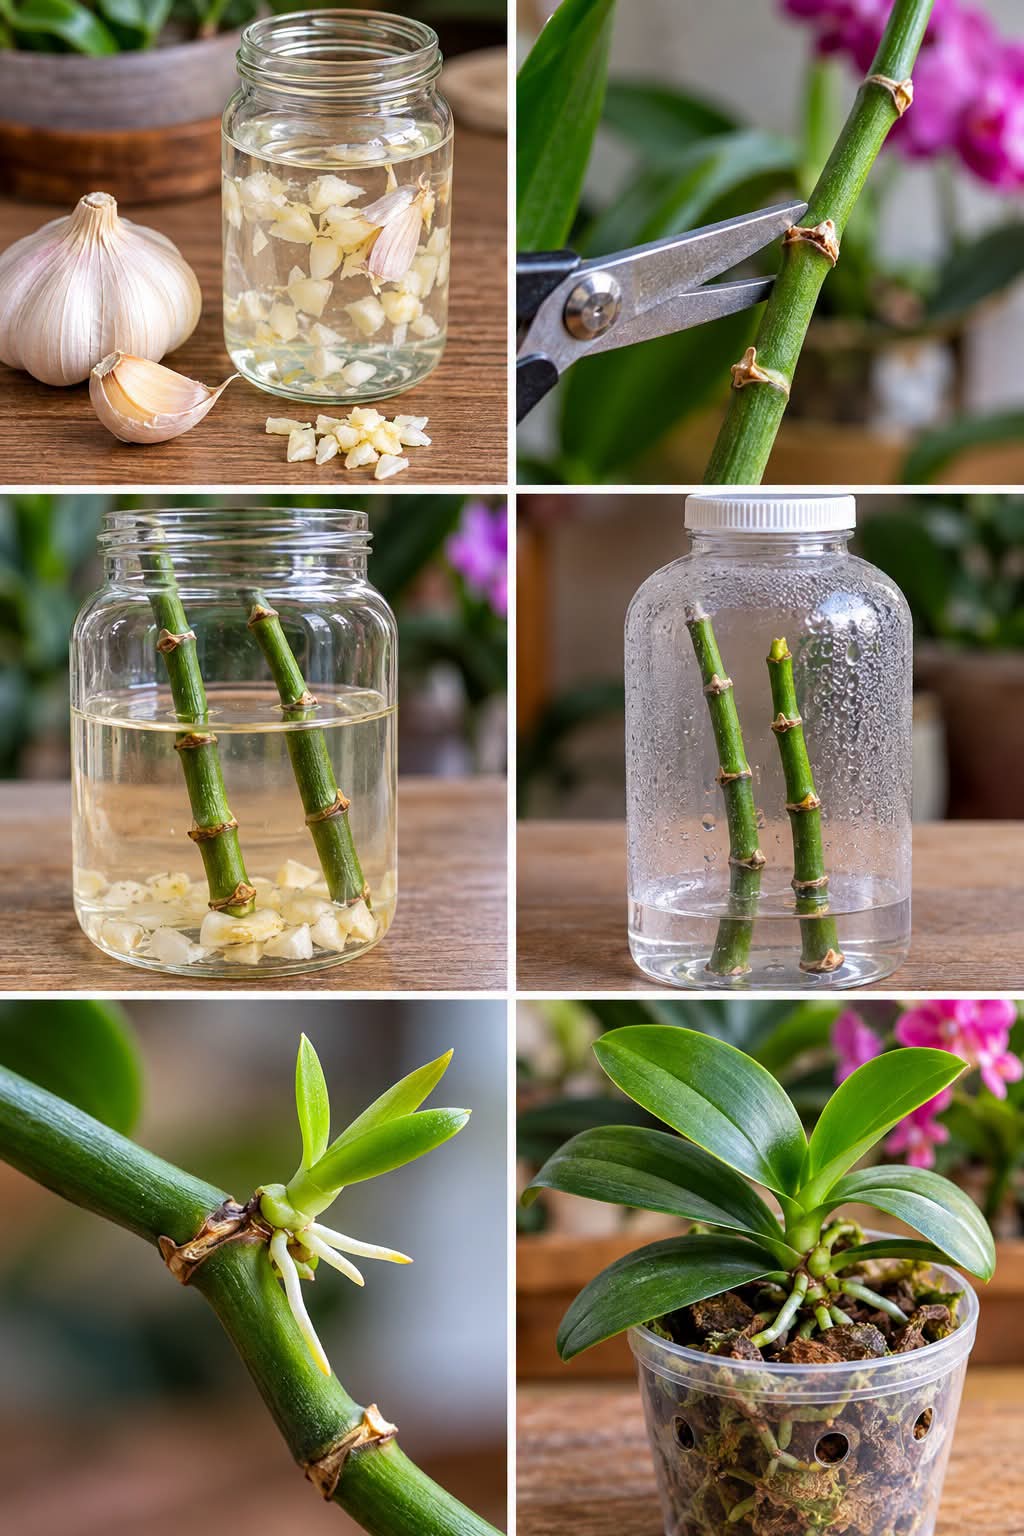
- Prepare Garlic Water Solution: Finely chop or crush 3–4 garlic cloves and submerge them in 500 ml of warm water. Let the mixture steep for 2–3 hours, then strain out the garlic solids.
- Cut Flower Spikes: Using sterilized shears, cut green flower spike stems into segments (about 4–6 inches long), ensuring each cutting contains at least 1–2 healthy node bumps.
- Initial Infusion Soak: Place the stem cuttings into the glass jar with the garlic water solution for 15–30 minutes to sanitize the cut edges and stimulate the nodes.
- High-Humidity Incubation: Pour out most of the liquid, leaving only 1 inch of clean water at the bottom of a sealable glass container. Stand the cuttings upright inside, seal the lid tightly to lock in humidity, and place in bright, indirect light.
- Keiki Development: Within 4 to 8 weeks, dormant nodes will swell and sprout vibrant green leaves accompanied by silver-green root growth.
- Potting the Plantlet: Once the new plantlet has developed 2–3 leaves and roots at least 2 inches long, gently cut it off the parent stem and pot it into a ventilated cup with coarse orchid bark.
3. Stage-by-Stage Propagation Lifecycle
| Stage | Action / Appearance | Timeline | Care Tip |
|---|---|---|---|
| 1. Preparation | Chop garlic, soak stem cuttings in solution | Day 1 | Ensure cutting shears are sanitized with rubbing alcohol. |
| 2. Humidity Enclosure | Cuttings placed sealed in transparent jar | Weeks 1 – 3 | Keep in warm room (22°C–26°C) out of direct hot sunlight. |
| 3. Node Sprouting | Leaves and tiny aerial roots break out from nodes | Weeks 4 – 8 | Ventilate jar once a week to exchange fresh air. |
| 4. Potting Up | Rooted Keiki transferred to orchid bark cup | Month 3+ | Keep bark slightly moist until roots establish firmly. |
4. Frequently Asked Questions (FAQ)
A: No. Cuttings must be made from healthy, green, and firm flower stems. Yellow or dried brown stems are dead tissue and will not produce plantlets.
A: No. Always strain the solid garlic pieces out before long-term incubation. Leaving raw garlic chunks in standing water for extended periods can cause organic decomposition and unwanted odors.
A: Wait until the new plantlet (Keiki) has produced at least 2–3 fully formed leaves and 2–3 roots that are around 2 inches (5 cm) long.
Final Thoughts
Using garlic water as a natural disinfectant alongside high-humidity incubation turns spent orchid stems into an endless source of new orchid plants. With a bit of patience, your cutting will grow into a thriving, independent orchid ready to bloom!