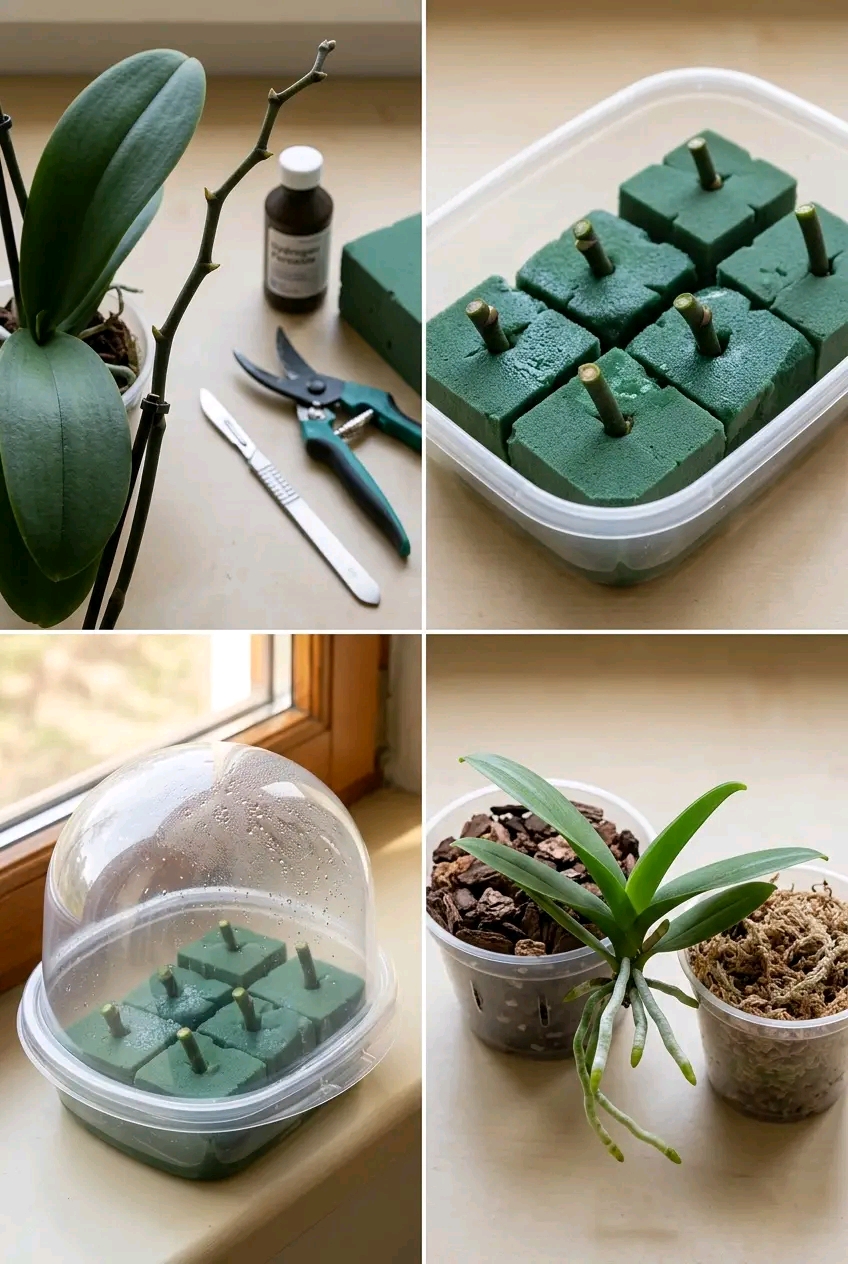
Propagating orchids at home often sounds like an intricate laboratory process, but reproducing your favorite Moth Orchid (Phalaenopsis) can actually be straightforward and highly rewarding 🏠🌸. Utilizing spent flower spikes, stem cuttings, floral foam blocks, and high-humidity mini-greenhouses allows indoor gardeners to turn spent flower stems into brand-new orchid plantlets (keikis) 🌿✨.
When flower spikes finish blooming, those dormant nodes contain active meristematic tissue capable of sprouting fresh shoots and aerial root systems 🔬🧬. By creating a clean, sterile environment and maintaining constant humidity, you can stimulate these dormant nodes to sprout without waiting for random offshoots to form on the mother plant 🧪⚠️.
In this master blog guide, we will explore the botanical science behind orchid stem propagation, compare propagation substrates, detail step-by-step instructions, and share essential care secrets for raising healthy baby orchids 📝👇🛡️!
🌸 The Botanical Science Behind Orchid Stem Propagation 🧪✨
In nature, orchids reproduce primarily through microscopic seeds, but stem nodes contain dormant growth buds (meristems) that can be activated vegetatively 🔬🧬.
Core Factors for Stem Node Propagation Success:
- Meristem Activation 🌱: Dormant nodes located along spent flower stems contain all the genetic information necessary to form leaves, stems, and aerial roots.
- Sterile Cutting Conditions 🛡️: Disinfecting cutting tools with hydrogen peroxide prevents bacterial soft rot and fungal pathogens from invading tender stem cuttings.
- Controlled Moisture Retention (Floral Foam) 🟩: Floral foam cubes hold consistent moisture without soaking the stem tissue directly, delivering continuous humidity to the node.
- High-Humidity Microclimate 💧: Covering cuttings with a clear plastic dome retains 90\%+ humidity, preventing desiccating air currents from drying out stem nodes before roots emerge.
📊 Comprehensive Comparison: Orchid Propagation Substrates
To help you choose the best propagation media for multiplying your orchid collection, compare these popular substrates side-by-side 📋👇:
| Propagation Substrate 🛡️ | Moisture Retention 🎯 | Root Rot Risk ⚠️ | Main Advantage ✨ | Skill Level Required 🗓️ |
|---|---|---|---|---|
| Floral Foam Cubes 🟩 | High & Steady | Low | Clean, uniform support & steady moisture 🌸 | Beginner Friendly 🗓️ |
| Sphagnum Moss 🌾 | Very High | Moderate | Natural organic moisture retention 🌿 | Intermediate ⏱️ |
| Pine Bark Mix 🪵 | Low | Very Low | Excellent aeration for established keikis 🪨 | Advanced ⏱️ |
| Pure Water (Hydro) 💧 | Continuous | High | Easy visual monitoring of root emergence ✨ | Intermediate |
🛡️ Key Benefits of Stem Node Propagation for Orchids 🌸✨
1. Multiplies Your Favorite Orchid Varieties 🌸✨
Propagating from stem nodes creates exact genetic clones of your mother orchid, preserving identical flower color, pattern, and blossom size.
2. Gives Spent Flower Spikes Second Life 🌿💚
Instead of cutting down old flower stems and throwing them away, you can transform spent spikes into a nursery of new orchid plantlets!
3. Cost-Effective Home Gardening Technique 🏠🪙
Expanding your indoor houseplant collection or growing unique floral gifts for friends and family requires no expensive greenhouse equipment.
4. Controlled & Sanitized Growth Environment 🧪🛡️
Using sterile floral foam and enclosed humidity domes keeps fungal spores and fungus gnats away from fragile stem nodes.
📝 Step-by-Step Instructions: How to Propagate Orchids from Stem Nodes ✂️💧
Pro-Tip: Always sterilize your scalpels, shears, and hands before handling stem cuttings to keep fungal spores away from open cut ends!
Step 1: Prepare & Sterilize Tools ✂️🧴
Clean your pruners, scalpel blade, and work surfaces thoroughly with 3\% hydrogen peroxide or rubbing alcohol to create a sterile cutting setup.
Step 2: Cut Healthy Stem Segments 🌸✂️
Select a healthy, green spent flower spike. Cut the spike into 2- to 3-inch segments, ensuring each piece contains at least one prominent, plump node in the middle.
Step 3: Hydrate Floral Foam Cubes 🟩💧
Soak green floral foam blocks in clean filtered or distilled water until fully saturated. Cut the foam into small, uniform cubes and place them inside a plastic tray.
Step 4: Insert Stem Cuttings 🟩🌱
Gently insert the bottom end of each stem cutting into the top center of a moist floral foam cube, keeping the central dormant node exposed above the foam line.
Step 5: Cover with Humidity Dome 💧🏠
Place a clear plastic dome or cover over the tray to trap ambient humidity. Position the tray in a warm spot (22\text{–}26^\circ\text{C}) receiving bright, indirect sunlight.
Step 6: Pot Up Emerged Keikis 🪴🌸
Once new leaves develop and aerial roots reach 2 to 3 inches in length, carefully remove the baby orchid from the foam and pot it up into a chunky pine bark and sphagnum moss blend.
🗓️ Essential Rules for Long-Term Baby Orchid Success 💡🛡️
Pairing your stem node propagation routine with ideal environmental care guarantees healthy young plants 🌟:
- Provide Bright, Filtered Sunlight ☀️: Keep humidity trays near east-facing windows. Avoid direct burning sunlight that overheats the plastic dome!
- Maintain Warm Ambient Temperatures 🌡️: Orchid cuttings require warm temperatures (22\text{–}28^\circ\text{C}) to trigger dormant node growth and speed up root development.
- Ventilate Humidity Domes Weekly 💨: Lift the clear dome for 5 minutes once a week to refresh air circulation and reduce stagnant moisture buildup.
- Transition Slowly to Bark Substrate 🪴: When potting new keikis, mix sphagnum moss with fine pine bark to ease the root system into standard orchid growing conditions.
🌟 Final Thoughts
Propagating Phalaenopsis Orchids using spent stem nodes, floral foam cubes, and humidity domes is a simple, highly effective method to expand your indoor garden 🌸🌿✨. By supplying gentle moisture, sterile surroundings, and consistent warmth, you can transform spent flower spikes into a thriving collection of vibrant new orchids 🏠🛡️. Try this rewarding propagation project today and watch fresh green shoots appear! 🚀🌸💜